Everything You Need to Know About Car Stereo Wiring Harness
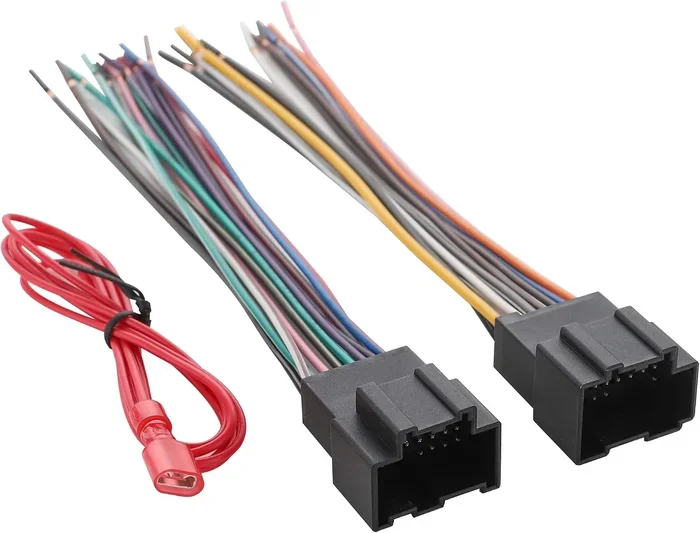
A car stereo wiring harness is a plug-and-play adapter that connects your aftermarket stereo to your vehicle’s factory wiring without cutting or splicing a single wire. Using the right wiring harness adapter saves time, prevents electrical damage, and makes car stereo installation a weekend DIY project anyone can handle.
So you just bought a shiny new aftermarket car stereo and you are ready to upgrade your ride. But then you open the box, see a bundle of wires, and suddenly your confidence drops. Do you really need to cut into your vehicle’s original wiring? Can you even figure out which wire goes where?
Here is the good news. You do not need to be an electrical expert. A car stereo wiring harness makes the entire process simple, safe, and surprisingly painless. Whether you are upgrading a daily driver or restoring a classic truck, this small adapter is the secret weapon that makes everything click. In this guide, we will walk you through everything you need to know about car stereo wiring harness adapters, from what they are to how to install one in under 30 minutes.
Key Takeaways
- A wiring harness adapter eliminates the need to cut factory wires during stereo installation.
- Using the correct harness protects your vehicle’s electrical system and prevents blown fuses.
- Most vehicles require a specific harness based on make, model, and year.
- Installation typically takes under 30 minutes with basic tools.
- Color-coded wires make matching connections simple and foolproof.
- An aftermarket car stereo sounds better and offers more features than factory units.
- Always test connections before securing everything behind the dash.
📑 Table of Contents
- What Is a Car Stereo Wiring Harness?
- Why You Need a Wiring Harness Adapter
- How to Choose the Right Car Stereo Wiring Harness
- Step-by-Step Car Stereo Wiring Harness Installation
- Common Car Stereo Wiring Harness Mistakes to Avoid
- Benefits of Using a Car Stereo Wiring Harness
- Frequently Asked Questions
What Is a Car Stereo Wiring Harness?
A car stereo wiring harness is a pre-wired adapter that bridges your new stereo and your vehicle’s existing electrical connections. Think of it as a translator. Your factory wiring speaks one language, and your new stereo speaks another. The harness translates between the two so everything connects perfectly.
Most harnesses plug directly into the back of your new stereo on one end and into the factory wiring on the other. No cutting. No soldering. No guesswork. You simply match colors, push the connectors together, and you are done.
These adapters come in hundreds of shapes and sizes because every vehicle has a slightly different wiring setup. A harness designed for a 2015 Honda Civic will not work for a 2003 Ford F-150. That is why finding the right wiring harness adapter for your specific vehicle is so important.
What Does a Wiring Harness Connect?
A typical car stereo wiring harness handles several key connections:
- Power supply — delivers constant and switched 12-volt power to the stereo.
- Ground wire — completes the electrical circuit and prevents static or feedback.
- Speaker wires — carry audio signals to each speaker in your vehicle.
- Antenna lead — connects to your factory antenna for radio reception.
- Illumination wire — dims the stereo display when your headlights are on.
Some advanced harnesses also include connections for steering wheel controls, backup cameras, and Bluetooth modules. The more features your new stereo has, the more wires the harness needs to manage.
Why You Need a Wiring Harness Adapter
You might be wondering why you even need a harness. Can you not just connect the wires directly? Technically, yes. But that approach comes with real risks. Let us break down why a wiring harness adapter is the smart choice for almost every installation.
Protection for Your Vehicle’s Electrical System
Your vehicle’s factory wiring was designed for the original stereo, not a power-hungry aftermarket unit. Cutting into those wires and connecting them improperly can cause short circuits, blown fuses, or even damage to your vehicle’s computer system. A car stereo wiring harness keeps your factory wiring untouched and intact.
Reversibility
Planning to sell your car someday? A harness makes it easy to remove your aftermarket stereo and reconnect the factory unit without any visible damage. This is a huge selling point if you want to keep your vehicle’s original look while still enjoying a better audio experience.
Time and Convenience
Without a harness, a stereo installation can take hours of tracing wires, testing connections, and troubleshooting errors. With a wiring harness adapter, most people finish the job in 20 to 40 minutes. That is a massive time savings, especially if you are doing this in your garage on a Saturday afternoon.
Error Prevention
Mixing up power and ground wires can fry your new stereo instantly. Color-coded harnesses eliminate this risk because each wire has a clear purpose and a foolproof connection point. You simply cannot plug things in the wrong way with a quality harness.
How to Choose the Right Car Stereo Wiring Harness
Not all harnesses are created equal. Choosing the wrong one can lead to frustration, extra trips to the auto parts store, or a stereo that does not work correctly. Here is how to find the perfect match for your setup.
Match the Harness to Your Vehicle
The first step is identifying your vehicle’s make, model, year, and trim level. This information is usually found on a sticker inside the driver’s door jamb or in your owner’s manual. Once you have those details, you can look up the correct car stereo wiring harness for your specific vehicle.
Many online retailers and auto parts stores have search tools where you enter your vehicle information and get a list of compatible harnesses. Always double-check compatibility before purchasing.
Match the Harness to Your Stereo
Your new stereo also matters. A single-DIN stereo uses a different harness than a double-DIN unit. Similarly, stereos with built-in amplifiers or navigation systems may require additional wire connections. Check the stereo’s installation guide to confirm which harness type it needs.
Look for Quality Construction
Cheap harnesses with thin wires and flimsy connectors can overheat or fail over time. Look for harnesses with:
- Oxygen-free copper wiring for better conductivity.
- Color-coded wires that match industry standards.
- Secure lock-tab connectors that do not wiggle loose.
- Heat-resistant insulation for under-dash environments.
Consider Extra Features
If your new stereo has features like a backup camera, steering wheel control interface, or external amplifier outputs, make sure the harness supports those connections. Some harnesses come as all-in-one kits that include everything you need for a complete upgrade.
Step-by-Step Car Stereo Wiring Harness Installation
Now for the fun part. Installing a car stereo wiring harness is one of the easiest car upgrades you can do. Here is a simple walkthrough that anyone can follow.
Step 1: Gather Your Tools
You will need a few basic items before you start:
- Wire strippers
- Electrical tape or heat shrink tubing
- A Phillips and flathead screwdriver
- A dash removal tool kit
- The correct wiring harness adapter for your vehicle
- The new stereo unit
That is it. You do not need a soldering iron or an electrical engineering degree. Just basic hand tools and a little patience.
Step 2: Disconnect the Battery
Safety first. Always disconnect the negative battery terminal before working on any electrical component in your vehicle. This prevents short circuits and protects both you and your vehicle’s electronics.
Step 3: Remove the Factory Stereo
Use your dash removal tools to carefully take out the old stereo. Most factory stereos are held in place by clips or a few screws. Gently pull the unit out and set it aside. You will see the factory wiring connector plugged into the back of the unit.
Step 4: Unplug the Factory Wiring
Carefully disconnect the factory wiring harness from the back of the old stereo. Take a photo or label the wires if you are unsure about the connections. This makes the next step much easier.
Step 5: Connect the Wiring Harness Adapter
This is the core step. Plug the factory-side connector of your car stereo wiring harness into the vehicle’s wiring. Then plug the stereo-side connector into your new unit. The color-coded wires should match up perfectly, and the connectors should click firmly into place.
Quick Tip: If you are using a separate antenna adapter, connect that too. Some vehicles use a different antenna plug than what the new stereo expects, and the adapter solves this problem instantly.
Step 6: Secure the Harness and Mount the Stereo
Tuck the wiring neatly behind the dash. Use zip ties or adhesive clips to keep wires secure and out of the way. Slide the new stereo into the dash kit and secure it with the provided screws or clips.
Step 7: Reconnect the Battery and Test
Reconnect the negative battery terminal. Turn the ignition on and power up your new stereo. Test every function: AM/FM radio, Bluetooth connectivity, USB input, speakers, and the display. Make sure all connections are solid and there is no static or buzzing.
Quick Tip: If the display does not dim when you turn on your headlights, check the illumination wire connection. This is one of the most common issues after a stereo install and it is an easy fix.
Common Car Stereo Wiring Harness Mistakes to Avoid
Even with a simple plug-and-play setup, mistakes can happen. Here are the most common errors people make during car stereo installation and how to avoid them.
Skipping the Ground Wire Connection
The ground wire is the most overlooked connection in any stereo install. Without a solid ground, you will hear buzzing, popping, or static through your speakers. Always make sure the ground wire is connected to a clean, bare metal surface on the vehicle chassis.
Using the Wrong Harness for Your Vehicle
This seems obvious, but it happens more often than you would think. Always verify the harness is designed for your exact vehicle and stereo combination. A mismatched harness can leave wires unconnected or force you into dangerous shortcuts.
Forgetting the Antenna Adapter
Factory antennas and aftermarket stereos often use different plug types. Without an antenna adapter, you will get no radio reception at all. These adapters are inexpensive and widely available, so there is no excuse to skip this small but critical piece.
Rushing the Test Phase
Many people bolt the stereo into the dash and walk away without fully testing every feature. Always test all audio sources, speaker channels, and display functions before finalizing the installation. Fixing a wiring issue after the stereo is mounted is much harder than fixing it before.
Ignoring Steering Wheel Controls
If your vehicle has steering wheel audio controls, you will need a separate interface module to keep them working with your new stereo. This is an easy step that people forget, and it can turn a smooth upgrade into an annoying workaround.
Benefits of Using a Car Stereo Wiring Harness
Let us quickly recap why a wiring harness adapter deserves a permanent spot in your garage toolbox.
- Safety: No exposed wires, no risk of short circuits, no damage to your vehicle.
- Simplicity: Plug and play. Anyone can do it with basic tools.
- Speed: Most installs finish in under an hour.
- Reversibility: Easily remove the aftermarket stereo and restore factory wiring.
- Reliability: Secure, color-coded connections reduce the chance of electrical issues.
- Cost savings: Avoid expensive trips to the installer for a simple upgrade.
The bottom line is that a car stereo wiring harness is one of the most affordable and valuable accessories you can buy for any stereo upgrade. It costs a fraction of what a professional installation would charge, and it gives you the confidence to tackle the job yourself.
Whether you are upgrading for better sound quality, adding modern features like Apple CarPlay or Android Auto, or simply replacing a worn-out factory radio, the right harness makes all the difference. It turns a potentially intimidating project into a satisfying DIY win that you can proudly show off to your friends.
Take your time, follow the steps, and enjoy your new aftermarket car stereo sound system. Your ears will thank you every time you hit the road.
Frequently Asked Questions
Can I install a car stereo wiring harness myself?
Absolutely. Most car stereo wiring harness adapters are designed for DIY installation. You only need basic tools like screwdrivers and wire strippers, and the plug-and-play design means no cutting or soldering is required. If you can connect a phone charger, you can install a stereo harness.
Do I need a wiring harness for every vehicle?
Nearly every vehicle benefits from a wiring harness adapter when installing an aftermarket stereo. Factory wiring connectors vary by make and model, and the harness ensures a clean, safe connection without modifying your original wiring. Always check compatibility for your specific vehicle before purchasing.
What happens if I wire the harness incorrectly?
Incorrect wiring can cause blown fuses, static in the speakers, or damage to your new stereo. This is why color-coded wires and clear instructions are so important. Always double-check every connection before turning on the ignition, and never power up the stereo without a secure ground connection.
How much does a car stereo wiring harness cost?
A quality car stereo wiring harness typically costs between $10 and $30. Some premium harnesses with extra features like steering wheel control interfaces may cost a bit more. Compared to a professional installation fee, this is a tiny investment with a huge payoff.
Will a wiring harness adapter work with a backup camera?
Many modern harnesses include a backup camera input connection. Check the harness specifications before purchasing to confirm it supports this feature. You may also need a separate video input cable depending on your stereo model.
Can I reuse the factory wiring harness for a future stereo swap?
Yes. One of the biggest advantages of using a wiring harness adapter is that your factory wiring remains untouched. When it is time to swap stereos again, simply unplug the harness from the new unit and connect it to the replacement. Your vehicle stays factory-clean and resale-ready.