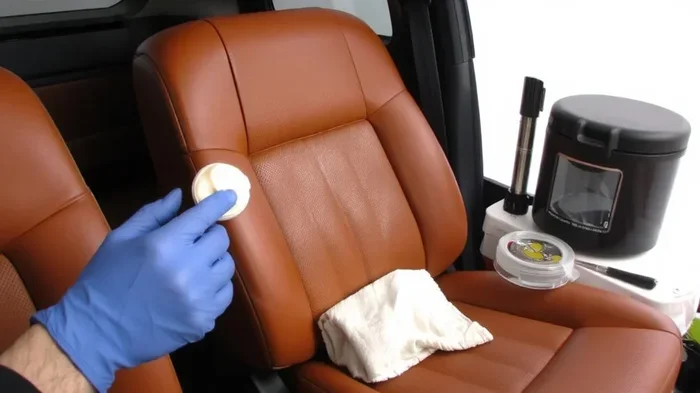
How Often Should Leather Car Seats Get Conditioned
Leather car seats should get conditioned every 3 to 6 months to stay soft, supple, and protected from daily wear. The right conditioning schedule depends on your climate, how often you drive, and what products you use. Regular conditioning creates a moisture barrier that keeps your seats from drying out, cracking, and fading over time.
Your leather car seats are one of the first things people notice when they step inside your vehicle. They look sleek, feel luxurious, and add real value to your car. But here is the thing most car owners forget: leather needs regular care to stay that way. Without proper maintenance, leather dries out, cracks, and fades much faster than you would expect.
How often should leather car seats get conditioned is one of the most asked questions in car care. The short answer is every 3 to 6 months. But the full answer depends on several factors like your climate, how much you drive, and what kind of conditioner you use. This guide breaks it all down so you can keep your seats looking great for years.
Whether you drive a brand-new SUV or a classic sedan with vintage leather, conditioning matters. It is not just about looks. It is about protecting the material from UV rays, heat, and daily friction. A good leather care routine saves you money on expensive repairs or even full seat replacements down the road.
Key Takeaways
- Condition every 3 to 6 months: This is the general rule for most drivers, but climate and usage can change this schedule.
- Watch for warning signs: Dryness, stiffness, fading, and small cracks all mean your seats need attention right away.
- Use the right products: Not all leather conditioners are the same. Choose pH-balanced formulas made for automotive leather.
- Avoid over-conditioning: Too much product can clog leather pores and create a greasy buildup.
- Clean before conditioning: Always wash your seats first so the conditioner absorbs properly.
- Climate matters a lot: Hot, dry, or cold environments speed up leather drying and need more frequent care.
- Consistency beats intensity: A light conditioning done regularly works better than one heavy treatment.
📑 Table of Contents
- Why Conditioning Leather Car Seats Matters
- How Often Should Leather Car Seats Get Conditioned
- Signs Your Leather Seats Need Conditioning
- Choosing the Right Conditioner for Your Seats
- Step-by-Step Guide to Conditioning Leather Car Seats
- Common Mistakes That Hurt Your Leather Seats
- Expert Tips to Make Your Leather Seats Last Longer
- Conclusion
Why Conditioning Leather Car Seats Matters
Leather is a natural material. It comes from animal hide, and just like your skin, it needs moisture to stay healthy. Without conditioning, leather loses its natural oils. Once those oils are gone, the material starts to stiffen and crack. This is not something that happens overnight, but it does happen steadily over time.
Most people do not think about their seat leather until they see visible damage. By then, the damage is already done. You cannot fully reverse deep cracks or severe fading. Prevention through regular conditioning is always cheaper and easier than repair.
The Science Behind Leather Drying
Leather has tiny pores that breathe and absorb moisture. When you sit on your seats, body oils and sweat naturally transfer to the surface. Over time, these oils break down the leather’s protective layer. Sunlight and heat accelerate this process even more. UV rays break down the fibers in the leather, causing it to become brittle.
A good leather conditioner fills in the micro-pores and creates a protective barrier. This barrier locks in moisture and shields the leather from outside elements. Think of it like putting sunscreen on your skin before going outside. It is a simple step that makes a huge difference.
What Happens When You Skip Conditioning
Skipping your car seat maintenance schedule leads to a chain of problems. First, the leather starts to feel stiff and rough. Then small cracks appear, especially in areas where you sit the most. Over months, those cracks grow wider. The color fades unevenly, leaving your seats looking old and worn.
In extreme cases, the leather can peel or flake entirely. At that point, you are looking at expensive reupholstering or seat replacement. Regular conditioning prevents all of this. It keeps the leather flexible and strong so it can handle daily use without breaking down.
How Often Should Leather Car Seats Get Conditioned
The general recommendation is to condition leather car seats every 3 to 6 months. But this is not a one-size-fits-all answer. Your schedule should match your driving habits and environment. Let us look at the details.
General Guidelines by Climate
Where you live plays a big role in how fast your leather dries out. Here is a simple breakdown:
- Hot and dry climates: Condition every 2 to 3 months. The sun and low humidity pull moisture out of leather fast.
- Humid climates: Every 4 to 6 months is usually enough. The moisture in the air helps keep leather hydrated longer.
- Cold climates: Every 3 to 4 months. Winter heating systems dry out indoor air, which affects your leather too.
- Moderate climates: Every 4 to 6 months works well for most drivers in these regions.
Factors That Change Your Conditioning Schedule
Climate is just one piece of the puzzle. Several other factors can speed up or slow down how quickly your leather needs conditioning.
How often you drive: If you use your car every day, the seats get more exposure to sunlight, body oils, and friction. Daily drivers should condition more often than cars that sit in the garage most of the time.
Parking habits: If you park outdoors in direct sunlight, your automotive leather takes more UV damage. Cars parked in garages or shaded areas stay in better shape longer.
Number of passengers: More people sitting on the seats means more body oils and sweat. Families with kids or pets may need to condition more frequently.
Type of leather: Not all leather is the same. Full-grain leather is more durable but still needs care. Bonded leather and vinyl leather have different needs. Check your manufacturer’s recommendations for your specific seat material.
Products used: A high-quality leather protection product lasts longer than a cheap one. Investing in a good conditioner means you can stretch the time between treatments.
| Factor | Condition More Often | Condition Less Often |
|---|---|---|
| Climate | Hot, dry, or cold | Humid, moderate |
| Driving Frequency | Daily use | Occasional use |
| Parking | Outdoors in sun | Garage or shade |
| Passengers | Multiple daily | Solo driver |
| Leather Type | Aniline, unprotected | Coated, bonded |
Signs Your Leather Seats Need Conditioning
You do not always need a calendar to know when to condition. Your seats will tell you when they need attention. Learning to spot these signs early can save your leather from permanent damage.
Visual Cues to Watch For
The first sign is usually a change in color. Leather fade happens when the material loses moisture and starts to look washed out. Darker seats may appear lighter or uneven in color. You might also notice a dull, matte finish where the leather used to have a natural shine.
Small cracks are another clear warning sign. These often appear on the seat surface, especially near seams or creases where the leather bends the most. If you see any white or light-colored patches, that means the leather is drying out and losing its oils.
Touch Tests You Can Do at Home
You can check your seats without any special tools. Simply run your fingers across the surface. Healthy leather feels smooth and slightly cool. If it feels rough, sticky, or overly dry, it needs conditioning.
Another test is the flexibility check. Gently press down on the seat and let go. Good leather should bounce back quickly. If it stays indented or feels stiff, the leather suppleness has been lost and a conditioner is needed.
One more quick test: touch the back of the seat near the top. This area gets the most sun exposure. If it feels significantly drier than other spots, that area needs attention first.
Quick Tips for Spotting Early Damage
- Check your seats once a month by touch and sight.
- Pay extra attention to areas near windows and the dashboard.
- Use a flashlight to spot small cracks you might miss in regular light.
- Note any changes in smell. Dry leather often has a dusty or stale odor.
Choosing the Right Conditioner for Your Seats
Not all leather conditioners are created equal. The wrong product can do more harm than good. Choosing the right one depends on your seat type, your budget, and how much time you want to spend on the process.
DIY vs Commercial Conditioners
Some car owners prefer DIY solutions. Coconut oil, olive oil, and even baby lotion are popular home remedies. While these can work in a pinch, they are not ideal for long-term care. Natural oils can go rancid over time and may clog leather pores. They also do not offer UV protection.
Commercial leather conditioners are formulated specifically for automotive use. They contain ingredients that moisturize without clogging pores. Most also include UV protectants and preservatives that extend the life of your leather. A quality leather protection product is worth the investment.
What to Look For in a Product
When shopping for a conditioner, look for these key features:
- pH-balanced formula: This ensures the product matches the natural acidity of leather.
- UV protection: Look for conditioners with sun-blocking ingredients to prevent fading.
- Non-greasy finish: You do not want your seats to feel slippery after application.
- Water-based formulas: These absorb better and are safer for the leather than solvent-based options.
- No harsh chemicals: Avoid products with silicone, petroleum, or heavy fragrances that can damage leather over time.
Popular brands like Leather Honey, 303 Aerospace Protectant, and Chemical Guys are well-known in the interior detailing world. They offer reliable results for most car owners. Always test a small hidden area first before applying any product to your entire seat surface.
Step-by-Step Guide to Conditioning Leather Car Seats
Conditioning your seats is not complicated, but doing it the right way makes a big difference. Follow these steps for the best results.
Step 1: Clean the Seats First
Never condition dirty leather. Dirt and dust get trapped under the conditioner, creating a muddy buildup. Start by vacuuming the seats to remove loose debris. Then use a mild leather cleaner and a soft cloth to wipe down the entire surface. Let the seats dry completely before moving to the next step.
Step 2: Apply the Conditioner
Put a small amount of conditioner on a microfiber cloth. Apply it in gentle circular motions across the seat surface. Work on one section at a time. Use light, even pressure and make sure the product spreads evenly. Do not skip the areas near seams and edges where cracks often start.
Step 3: Let It Absorb
After applying the conditioner, let it sit for 10 to 15 minutes. This gives the leather time to absorb the moisture and nutrients. Do not sit on the seats during this time. The absorption period is crucial for the product to work effectively.
Step 4: Buff Off the Excess
Use a clean, dry microfiber cloth to gently buff away any leftover conditioner. This removes excess product and gives the leather a clean, natural finish. Your seats should feel smooth and soft, not greasy or sticky.
How Long Does the Process Take?
A full conditioning session for all seats usually takes about 30 to 45 minutes. The actual application takes less time, but the waiting and buffing steps add up. For most drivers, this is a quick and easy task that fits into a weekend routine.
Quick Tips for Best Results
- Condition in a shaded area or garage to avoid direct sunlight during application.
- Do not over-apply. A little goes a long way with quality conditioners.
- Reapply conditioner to high-wear areas like the driver’s seat more frequently.
- Wear gloves to keep your hands clean and avoid transferring oils from your skin.
Common Mistakes That Hurt Your Leather Seats
Even with the best intentions, many car owners make mistakes that damage their leather. Knowing what to avoid is just as important as knowing what to do.
Over-Conditioning Problems
More is not always better. Applying too much conditioner too often can clog the leather pores. This prevents the material from breathing and can lead to a sticky, greasy surface. Over-conditioned leather also attracts more dirt because the excess product sits on top of the surface instead of absorbing into it.
Stick to your conditioning schedule and use only the recommended amount. If you are unsure, it is better to apply less and reapply later than to put on too much at once.
Using the Wrong Products
This is one of the most common mistakes. Using household cleaners, all-purpose sprays, or non-automotive products on leather can strip away natural oils and cause damage. Avoid products that contain alcohol, harsh solvents, or silicone. These dry out the leather and accelerate cracking.
Also, never use a vinyl or plastic conditioner on leather seats. These products are formulated for different materials and can break down leather fibers over time. Always check the label to confirm the product is safe for leather.
Ignoring Small Cracks
Some owners notice small cracks and ignore them, hoping they will not get worse. This is a mistake. Small cracks are early signs of dehydration. If you address them with conditioning right away, you can often prevent them from spreading. Once cracks become deep, no conditioner can fully repair them.
Skipping Regular Cleaning
Conditioning without cleaning first is like painting over a dirty wall. The product does not absorb properly, and dirt gets sealed in. Make cleaning part of your regular leather care routine so your conditioner can do its job effectively.
Expert Tips to Make Your Leather Seats Last Longer
Conditioning is the most important part of leather care, but it is not the only thing you can do. A few extra habits can significantly extend the life of your seat leather and keep it looking new.
Park in the shade whenever possible. UV damage is the number one enemy of leather. Even a few minutes of direct sun exposure each day adds up over months and years. A windshield sunshade is a simple and inexpensive way to reduce UV exposure when you park outside.
Wipe up spills immediately. Liquids can seep into leather and cause staining or moisture damage. The longer a spill sits, the harder it is to clean. Keep a microfiber cloth in your car for quick cleanup.
Use seat covers for pets and kids. If you regularly transport pets or young children, seat covers add an extra layer of protection. They reduce scratches, stains, and excess oil transfer to the leather surface.
Keep your car at a stable temperature. Extreme heat and extreme cold both stress leather. If possible, use a garage or covered parking. In very hot weather, crack your windows slightly to reduce interior heat buildup.
Follow a consistent maintenance routine. Set a reminder on your phone or calendar for your next conditioning session. Consistency is the key to long-lasting leather. A little effort every few months saves you from expensive repairs later.
Consider professional detailing once a year. While regular home conditioning keeps your seats in good shape, a professional interior detailing service can deep-clean and restore leather that has seen heavy use. This is especially helpful for older vehicles or cars with significant wear.
Taking care of your leather seats is an investment. Well-maintained leather can last 10 to 15 years or more, while neglected leather may need replacement in just 5 to 7 years. The difference comes down to simple, consistent care.
Conclusion
How often should leather car seats get conditioned is a question with a clear answer: every 3 to 6 months for most drivers. But the real secret is consistency. Regular conditioning protects your leather from drying, cracking, and fading. It keeps your seats looking premium and feeling comfortable every time you get behind the wheel.
Remember to watch for early warning signs like stiffness, fading, and small cracks. Use the right products, follow the correct application process, and avoid common mistakes like over-conditioning or using the wrong cleaners. With a little effort and the right leather care routine, your car seats will stay beautiful and durable for many years to come.
Start today. Check your seats, pick a quality conditioner, and make conditioning part of your regular car maintenance. Your future self will thank you when your leather seats still look and feel amazing years down the road.
Frequently Asked Questions
Can I condition my leather car seats too often?
Yes, over-conditioning is a real problem. Applying too much conditioner too frequently can clog the leather pores and create a greasy surface. Stick to a schedule of every 3 to 6 months and use only the recommended amount of product for best results.
What is the best homemade conditioner for leather car seats?
A simple mix of beeswax and coconut oil can work as a temporary solution. However, homemade conditioners do not offer UV protection and can go rancid over time. For long-term care, a commercial automotive leather conditioner is always a better choice.
How do I know if my leather seats are vinyl or real leather?
Check your owner’s manual for the seat material information. Real leather has a natural grain pattern and slight texture variations. Vinyl leather feels smoother and more uniform. If you are unsure, a professional detailer can identify the material for you.
Does conditioning leather car seats protect against UV damage?
Yes, a good quality leather conditioner contains UV protectants that help shield the leather from sun damage. However, conditioning alone is not enough. Parking in the shade or using a sunshade provides additional protection against fading and drying.
Can cracked leather car seats be repaired?
Small surface cracks can often be improved with regular conditioning. Deep cracks that have torn the leather fibers cannot be fully reversed. In those cases, professional leather repair or seat replacement may be necessary. This is why early conditioning is so important.
Should I condition brand-new leather car seats?
Yes, conditioning new leather seats is a smart move. Factory leather has been treated, but an additional layer of protection helps it resist daily wear from day one. Wait about 30 days after purchase before applying conditioner to let the factory treatment settle in.