How Do You Use a Touch-Up Paint Stick – Easy Guide
Using a touch-up paint stick is one of the simplest ways to fix minor scratches and chips on your car. This guide walks you through every step, from preparing the surface to applying the final clear coat. You will learn the right tools, techniques, and common mistakes to avoid for a flawless finish.
Have you ever noticed a small scratch or chip on your car and thought, “I should fix that”? A touch-up paint stick is the easiest and most affordable way to handle minor automotive paint damage right at home. Whether it is a parking lot scrape or a small rock chip from highway driving, this simple tool can make a big difference. In this guide, we will walk you through everything you need to know about using a touch-up paint stick effectively. By the end, you will feel confident tackling those small blemishes yourself and saving money on costly body shop visits.
Keeping your car looking good is about more than just aesthetics. Small scratches and chips can lead to rust if left untreated. A touch-up paint stick acts as a quick shield against corrosion. It is a fast solution that works for most minor car scratch repair needs. Let us dive into how to use one properly.
Key Takeaways
- Quick Fix Solution: A touch-up paint stick lets you repair small scratches and chips at home in minutes.
- Proper Prep Matters: Cleaning and sanding the area before painting ensures the paint adheres properly and lasts longer.
- Match Your Paint Code: Always find your vehicle’s paint code to get the exact color match for a seamless repair.
- Thin Layers Work Best: Applying multiple thin coats prevents drips and gives a smoother, more professional result.
- Clear Coat Is Essential: The clear coat protects the touch-up paint and gives it that glossy, factory-finish look.
- Avoid Common Mistakes: Skipping primer, applying too much paint, or painting in direct sunlight can ruin your repair.
📑 Table of Contents
- What Is a Touch-Up Paint Stick?
- Why You Should Use a Touch-Up Paint Stick
- How to Prepare Your Car for Touch-Up Paint
- Step-by-Step Guide to Using a Touch-Up Paint Stick
- Common Mistakes to Avoid
- Tips for a Professional-Looking Finish
- How Long Does a Touch-Up Paint Repair Last?
- Frequently Asked Questions
- Conclusion
What Is a Touch-Up Paint Stick?
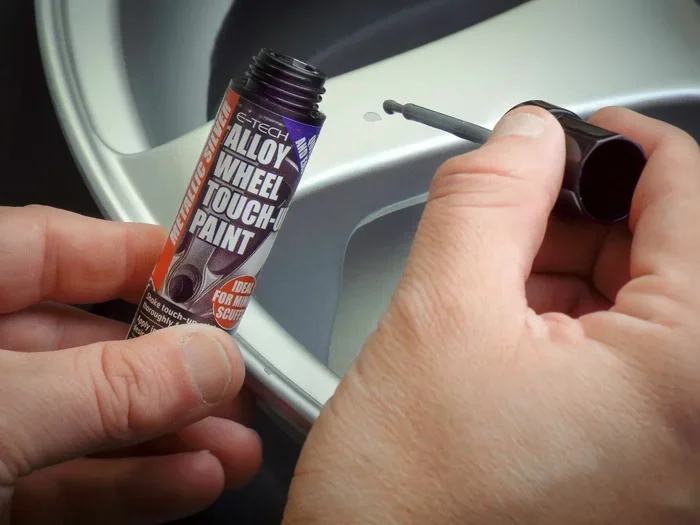
A touch-up paint stick is a small, pre-mixed paint applicator designed for fixing minor damage on your vehicle. It comes in a compact, pen-like format that is easy to hold and control. The paint is already matched to your car’s original color code. You simply apply it directly to the damaged area. These sticks are widely available at auto parts stores and online. They are a staple in any vehicle touch up kit.
Unlike spray cans or larger paint bottles, a paint touch up pen gives you precision. The narrow tip lets you fill in small chips and scratches without making a mess. Most automotive touch up sticks include a built-in brush or applicator tip. This makes them beginner-friendly and perfect for quick repairs. They are not meant for large areas of damage, but for the small stuff, they work great.
Types of Touch-Up Paint Sticks
Not all automotive paint sticks are the same. Here are the most common types you will find:
- Single-Stage Paint Sticks: These combine color and clear coat in one stick. They are best for older vehicles that do not have a separate clear layer.
- Base Coat and Clear Coat Sticks: These come in two parts. You apply the color first, then the clear coat on top. This gives a more durable and glossy finish.
- Primer and Paint Combo Sticks: Some kits include a primer stick along with the paint. This is ideal for deeper chips that need extra protection before painting.
Why You Should Use a Touch-Up Paint Stick
There are many reasons to keep a touch-up paint stick in your garage or glove box. Let us look at the biggest benefits.
1. Prevents Rust and Corrosion
When your car’s paint gets chipped or scratched, the metal underneath is exposed. Moisture and road salt can cause rust to form quickly. A car paint touch up with a paint stick seals that exposed area. This stops rust before it starts. It is one of the best rust prevention methods for small damage.
2. Saves Money
A professional automotive paint repair at a body shop can cost hundreds of dollars for a single chip. A touch-up paint stick costs between $10 and $30. You can fix multiple chips and scratches with one stick. That is a huge savings over time.
3. Maintains Your Car’s Value
If you ever plan to sell or trade in your car, small scratches and chips can lower its value. Keeping your paint looking fresh with regular car body repair touch-ups helps maintain resale value. A vehicle scratch repair done right can make your car look years newer.
4. Quick and Easy
You do not need special skills or expensive tools. A paint stick application takes about 15 to 30 minutes for a small repair. No need to wait for an appointment at a shop. You can fix it on your own time, right in your driveway.
How to Prepare Your Car for Touch-Up Paint
Proper preparation is the most important step in any touch up paint technique. If you skip this step, the paint may not stick or could peel off later. Take your time with prep for the best results.
Step 1: Find Your Paint Code
Every vehicle has a unique paint code. This code tells you the exact color formula used by the manufacturer. You will find it on a sticker or metal plate, usually located on the driver’s side door jamb. Some cars also list it on the firewall or under the hood. Write down the code and use it when purchasing your touch-up paint stick. A correct car paint matching job depends on using the right code.
Step 2: Clean the Damaged Area
Before you apply any paint, the area must be clean. Use a mild car wash soap and warm water to wash the damaged spot. Remove all dirt, wax, and grease. Dry the area thoroughly with a microfiber cloth. Any debris left on the surface can cause the paint to adhere poorly.
Step 3: Sand the Area Lightly
Use a fine-grit sandpaper, around 2000 to 3000 grit, to lightly sand the damaged area. This creates a rough surface for the paint to grip. Be gentle. You are not trying to remove paint; you are just creating texture. Wipe away any dust with a damp cloth after sanding.
Step 4: Apply Primer (If Needed)
If the chip goes down to bare metal, you should apply a primer first. Some automotive touch up kits include a primer stick. Apply a thin layer of primer and let it dry for about 10 to 15 minutes. The primer protects the metal and helps the color paint bond better. This is a key step in automotive paint repair that many people skip.
Step-by-Step Guide to Using a Touch-Up Paint Stick
Now that your car is prepped, it is time to apply the paint. Follow these steps carefully for the best touch up paint technique.
Step 1: Shake the Paint Stick Well
Before you start, shake the touch-up paint stick for about 30 seconds. This mixes the paint thoroughly and ensures a consistent color. A well-shaken stick applies more evenly and reduces the chance of streaks.
Step 2: Apply a Thin First Coat
Hold the stick like a pen and gently apply the paint to the damaged area. Use light, steady strokes. Do not press too hard. It is better to apply several thin coats than one thick one. A thick coat will drip and take longer to dry. Let each coat dry for about 10 to 15 minutes before adding the next.
Step 3: Build Up the Paint
Continue applying thin coats until the paint is level with the surrounding surface. Most chips and scratches need two to three coats. Check the area after each coat. The goal is to fill the damage completely without building up too much paint. Patience here pays off.
Step 4: Let It Cure
Once you have applied enough paint, let it cure for at least 24 hours. Curing is different from drying. Drying means the surface feels dry to the touch. Curing means the paint has fully hardened underneath. Do not wash or touch the area during this time.
Step 5: Apply Clear Coat
If your automotive paint stick does not include a clear coat, you will need to apply one separately. The clear coat protects the color paint and adds shine. Apply one to two thin coats of clear coat, letting each dry for 10 to 15 minutes. This step gives your repair that glossy, factory-finish look.
Step 6: Blend and Polish
After the clear coat has fully cured, use a polishing compound to blend the repair into the surrounding paint. Apply a small amount of polish to a microfiber cloth and gently buff the area in circular motions. This removes any excess paint and smooths out the transition between the repair and the original paint. The result should look seamless.
Quick Tips for Better Results
- Work in a shaded area: Direct sunlight can cause the paint to dry too fast and leave uneven results.
- Use painter’s tape: Tape off the area around the damage to keep your repair clean and precise.
- Keep a steady hand: Slow, controlled strokes give the best application. Do not rush.
- Use a toothpick for tiny chips: For very small chips, dip a toothpick into the paint for better control.
- Check the color in sunlight: Always inspect your work in natural light to make sure the color matches.
Common Mistakes to Avoid
Even with a simple tool like a touch-up paint stick, mistakes can happen. Here are the most common ones and how to avoid them.
1. Applying Too Much Paint at Once
This is the number one mistake people make. A thick blob of paint looks obvious and takes forever to dry. Always use thin, even layers. Build up gradually. Less is more when it comes to paint stick application.
2. Skipping the Primer
For deeper chips that expose bare metal, skipping primer leads to rust. The primer creates a protective barrier and helps the paint stick. Do not skip this step if your damage goes below the surface.
3. Painting in Direct Sunlight
Heat causes the paint to dry too quickly. This can lead to bubbling, cracking, and poor adhesion. Always work in a cool, shaded area or in your garage. A car scratch fix done in the right conditions will look much better.
4. Not Matching the Paint Code
Using the wrong color code is a waste of time and effort. The repair will stand out even more than the original damage. Always double-check your paint code before purchasing a touch-up paint stick.
5. Forgetting to Buff and Polish
Skipping the final blending and polishing step leaves a visible repair line. Take the extra few minutes to buff the area. The difference between a good repair and a great repair is in the finishing.
6. Touching the Repair Too Soon
It can be tempting to check your work right away, but the paint needs time to cure. Wait at least 24 hours before touching or washing the area. Rushing this step can ruin an otherwise perfect repair.
Tips for a Professional-Looking Finish
Want your vehicle scratch repair to look like it was done at a dealership? Follow these expert tips.
Use the Right Lighting
Always inspect your work in bright, natural light. Garage lighting or indoor lamps can hide imperfections. Step back and look at the repair from different angles. This helps you spot any uneven spots or missed areas.
Practice on a Hidden Spot First
If you are new to using a touch-up paint stick, practice on a hidden area of your car first. The underside of a bumper or behind a wheel well are good spots. This lets you get comfortable with the applicator before working on visible areas.
Invest in Quality Products
Not all automotive paint sticks are created equal. Cheap sticks may have poor color match or low-quality paint that peels quickly. Invest in a reputable brand. Look for kits that include primer, color, and clear coat. A quality vehicle touch up kit makes a noticeable difference in the final result.
Maintain Your Repairs
A touch-up repair is not permanent. Over time, the paint may chip or fade. Inspect your repairs every few months. If you notice any wear, apply a new thin coat to keep the area protected. Regular maintenance keeps your car scratch repair looking fresh for years.
Know When to See a Professional
A touch-up paint stick works great for small chips and scratches. But if the damage is deep, covers a large area, or has caused significant rust, it is time to see a professional. A body shop has the tools and expertise for major automotive paint repair. Do not try to fix extensive damage with a paint stick. Know the limits of what this tool can do.
How Long Does a Touch-Up Paint Repair Last?
The lifespan of a touch-up paint repair depends on several factors. The quality of the paint stick, the preparation work, and the environment all play a role. A well-done repair with proper primer and clear coat can last for several years. However, it is not a permanent fix. Weather, UV rays, and daily wear will eventually affect the repair. The key is to maintain it. A quick reapplication of paint every year or so keeps the repair looking good and prevents rust from forming.
Factors that affect longevity include:
- Paint quality: Higher quality automotive touch up products last longer.
- Preparation: Proper cleaning, sanding, and priming extend the life of the repair.
- Location of the repair: Areas exposed to more road debris, like the front bumper, may need touch-ups sooner.
- Weather exposure: Cars parked outdoors in harsh conditions may see faster wear on touch-up repairs.
- Clear coat protection: Always applying a clear coat layer adds significant durability.
By taking care of your car paint touch up, you can enjoy a clean, protected surface for a long time. It is a small investment of time that pays off in protecting your vehicle.
Frequently Asked Questions
Can I use a touch-up paint stick on rusted areas?
Yes, but only if the rust is minor and has not eaten through the metal. You must first remove the rust using fine sandpaper or a rust remover. Apply a primer to the bare metal before using the touch-up paint stick. This prevents the rust from spreading under the new paint. For deep rust holes, a professional repair is recommended.
How long should I wait before washing my car after a touch-up repair?
Wait at least 48 to 72 hours before washing your car. The paint needs full time to cure, and the clear coat especially takes longer to harden completely. Washing too soon can smear or peel the repair. If you must wash the car sooner, avoid the repaired area and rinse around it carefully.
Will a touch-up paint stick match my car’s color perfectly?
Most touch-up paint sticks are color-matched to your vehicle’s paint code, so they come very close. However, factors like sun fading and age can make an exact match difficult. The repair may be slightly visible up close but should blend well from a normal viewing distance. Applying a clear coat and polishing helps minimize any color difference.
Can I use a touch-up paint stick on a deep scratch?
A touch-up paint stick works best on shallow scratches and small chips. For deep scratches that have cut through the paint layers, the repair may not be as seamless. You can still fill a deep scratch with the paint stick, but blending it may require more effort. For deep damage, consider combining the paint stick with other car body repair techniques or consult a professional.
Do I need to sand before applying touch-up paint?
Yes, light sanding is recommended for most repairs. Sanding creates a rough surface that helps the paint adhere better. Use a fine-grit sandpaper (2000 grit or higher) and sand gently. Do not sand too aggressively. After sanding, wipe the area clean with a damp cloth before applying the paint. This small step makes a big difference in the longevity of your paint stick application.
Can I apply clear coat over a touch-up repair that is already dry?
Yes, absolutely. If your automotive paint stick does not include a clear coat, you should apply one separately after the color paint has fully cured. Apply thin, even coats of clear coat and let each layer dry before adding the next. The clear coat adds protection and a glossy finish that makes the repair look professional. Always use a clear coat that is compatible with your paint type.
Conclusion
Using a touch-up paint stick is one of the most practical skills any car owner can learn. It saves you money, prevents rust, and keeps your vehicle looking great. The process is simple: clean the area, apply primer if needed, use thin layers of paint, add a clear coat, and polish for a smooth finish. By avoiding common mistakes and taking your time with each step, you can achieve results that look professional and last for years.
Remember, a touch-up paint stick is designed for minor damage. It is not a replacement for professional body work on deep scratches or large areas of damage. But for the everyday chips and scrapes that come with driving, it is an invaluable tool. Keep one in your garage, learn the technique, and your car will thank you. Start today, and you will see how easy and rewarding a car scratch fix at home can be.