How Do You Touch Up a Spot on a Car the Simple Way
Touching up a spot on your car is easier than you think and can save you hundreds of dollars in repair costs. With the right touch up paint kit and a few simple tools, you can fix chips, scratches, and spots in under an hour. This guide walks you through every step, from prepping the surface to applying the final clear coat. Whether you are dealing with a small rock chip or a fresh scratch, you will learn the car scratch repair method that works best for your situation. Follow along and your car will look as good as new in no time.
Have you ever noticed a small chip or scratch on your car and thought, “I should fix that”? Well, you absolutely can. How do you touch up a spot on a car the simple way? It is not as hard as most people believe. With a little patience and the right supplies, you can make that blemish disappear in no time.
Every car owner deals with car paint chip repair at some point. Rocks fly up from the road. Parking lot dings happen. Keys get too close to the hood. These small spots may seem harmless at first, but they can lead to rust and bigger problems if you ignore them. The good news is that a simple touch up paint job can stop the damage in its tracks.
This guide will walk you through the entire process. You will learn what supplies you need, how to prep the area, and the exact steps to get a professional-looking finish. We will also cover common mistakes so you do not undo your hard work. Let us get started.
Key Takeaways
- Quick Fix at Home: You can touch up a spot on your car yourself using a basic paint touch up kit and common household items.
- Right Supplies Matter: Using the correct automotive touch up paint matched to your car’s code ensures a seamless repair.
- Prep Is Everything: Cleaning and sanding the area properly is the most important step for a lasting car scratch repair.
- Avoid Common Mistakes: Skipping the clear coat or applying too much paint are the top errors people make during spot repair car jobs.
- Know When to Call a Pro: Deep damage, large areas, or rusted spots may need professional car body repair attention.
- Prevent Future Damage: Regular car maintenance tips like waxing help protect your paint and extend the life of your touch up.
📑 Table of Contents
- What Is a Spot Touch Up and Why Does It Matter?
- Gathering Your Touch Up Supplies
- Step-by-Step Guide to Touching Up a Spot on Your Car
- Common Mistakes to Avoid During Spot Repair
- When Should You Call a Professional?
- Preventing Future Damage and Keeping Your Car Looking Great
- Final Thoughts on Touching Up Spots
What Is a Spot Touch Up and Why Does It Matter?
A spot touch up means filling in a small damaged area on your car’s paint with matching color. This could be a rock chip, a shallow scratch, or a small scuff. The goal is to protect the metal underneath and keep your car looking clean.
You might wonder why bother with such a small spot. Here is the truth: even a tiny chip can expose bare metal to moisture. That moisture leads to rust. Rust spreads fast and becomes expensive to fix. A simple car scratch repair today can save you from a full panel replacement tomorrow.
Think of it like a small cut on your skin. If you leave it uncovered, it gets infected. But if you put a bandage on it right away, it heals clean. Automotive touch up works the same way. You are protecting your car’s “skin” from the elements.
When Should You Touch Up a Spot?
The best time to fix a spot is as soon as you notice it. Fresh damage is much easier to repair than old, rusted damage. Here are the signs you should act now:
- You see bare metal or silver color showing through the paint
- A small chip or crack has appeared after a recent drive
- You notice a scratch that goes through the clear coat
- There is any sign of rust forming, even a tiny dot
- The damage is smaller than a quarter in size
If the damage is larger than that or the metal is already bubbling, you may need more serious car body repair. But for most everyday spots, a DIY touch up works perfectly.
Gathering Your Touch Up Supplies
Before you start, you need the right tools. Having everything ready makes the process smooth and fast. You do not want to stop halfway through because you are missing something.
Essential Supplies for Car Paint Chip Repair
Here is what you will need to gather before you begin:
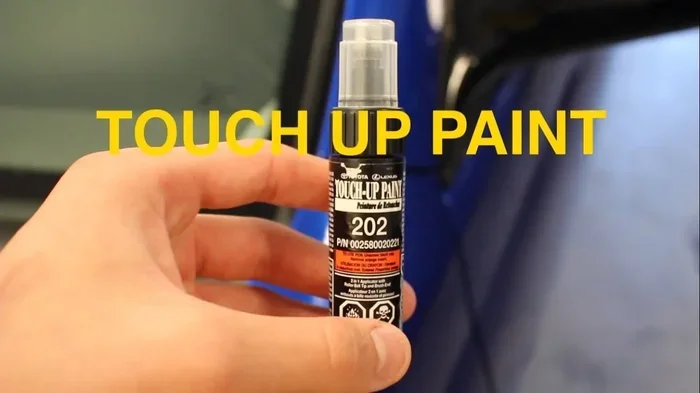
- Touch up paint matched to your car’s paint code
- Paint touch up pen or small brush applicator
- Fine sandpaper (1500 to 2000 grit)
- Rubbing compound or polishing compound
- Microfiber cloths (at least two)
- Isopropyl alcohol or car wash soap
- Clear coat spray (optional but recommended)
- Tape (painter’s tape or masking tape)
- A small toothpick or fine-tip applicator
Finding your car’s paint code is easy. Check the driver’s side door jamb. There should be a sticker or plate with a code like “WA” or “S345.” Write this down before you go shopping. Most auto parts stores can match this code to the right automotive touch up paint.
Quick Tip: Choosing the Right Paint Match
Not all touch up kits are created equal. Cheap kits often have poor color matching. Spend a little more on a quality brand. Your goal is a car paint matching result that blends in seamlessly. Read reviews online before you buy. A good paint touch up kit usually costs between fifteen and forty dollars.
Step-by-Step Guide to Touching Up a Spot on Your Car
Now for the part you have been waiting for. Here is the full process for how do you touch up a spot on a car the simple way. Follow each step carefully for the best results.
Step One: Clean the Damaged Area
Start by washing the area around the spot. Use warm water and car wash soap. Dry it completely with a clean microfiber cloth. Then dampen a fresh cloth with isopropyl alcohol and wipe the damaged spot. This removes any oils, wax, or dirt that could interfere with the paint adhesion.
Do not skip this step. If there is any grease or residue on the surface, the touch up paint will not stick properly. Clean, dry, and alcohol-prepped surfaces give the best spot repair car results.
Step Two: Sand the Edges Gently
Take your fine sandpaper (1500 to 2000 grit) and gently sand the edges of the damaged area. You are not trying to remove paint. You are just creating a slightly rough surface so the new paint can grip. Use light pressure and sand in one direction.
After sanding, wipe the area clean with a dry cloth. You should see the edges of the chip or scratch are now slightly rough to the touch. This is exactly what you want.
Step Three: Apply the Touch Up Paint
Shake your touch up paint bottle well. If you are using a pen, twist the tip to expose the paint. If you are using a brush, dip just the very tip into the paint.
Apply the paint in thin layers. Do not glob it on. Use the toothpick or applicator to carefully fill the chip or scratch. Let the first layer dry for about ten to fifteen minutes. Then add a second thin layer if the spot is still visible.
Pro tip: It is better to apply several thin layers than one thick one. Thick paint takes longer to dry and often looks uneven. Patience here pays off big time in your car scratch repair results.
Step Four: Let It Cure
Let the paint cure for at least twenty-four hours. Do not touch it, wash the car, or drive through rain during this time. The paint needs full time to harden and bond with the existing surface.
If you are in a rush, you can use a fast-dry clear coat spray over the area after the base paint has dried. This adds protection and helps the repair blend in better.
Step Five: Blend and Polish
Once the paint is fully dry, use rubbing compound on a microfiber cloth. Rub it gently over the repaired area in small circles. This blends the touch up paint into the surrounding paint. Keep going until the spot is no longer visible.
Finish by applying a coat of car wax over the entire panel. This protects the repair and gives your car a uniform shine. You are now done with your car paint touch up!
Common Mistakes to Avoid During Spot Repair
Even with the best intentions, people make mistakes during automotive touch up. Here are the ones to watch out for:
- Skipping surface prep: This is the number one mistake. Dirty or oily surfaces lead to peeling paint.
- Applying too much paint: Thick layers bubble, crack, and look obvious. Thin and steady wins the race.
- Using the wrong paint color: A mismatched spot stands out more than the original chip. Always match your paint code exactly.
- Not letting paint dry fully: Rushing the process leads to smudges and poor adhesion. Wait the full time.
- Forgetting the clear coat: The clear coat protects your repair from UV rays and weather. Do not skip it.
- Touching the spot too soon: Resist the urge to check it before it is fully cured. Patience is your best friend.
Avoiding these mistakes will make your fix car scratches job look ten times better. Take your time and do it right the first time.
When Should You Call a Professional?
DIY touch ups are great for small spots. But some situations call for a professional. Here is when you should stop trying to fix it yourself and call in the experts:
- The damage is larger than a half-dollar size
- Rust has already formed and spread
- The scratch goes through multiple layers of paint
- The damage is on a curved or complex body panel
- You have tried a touch up and it did not look right
- The car is a classic or collectible model
Professionals have tools and techniques that go beyond what a paint touch up brush can do. They can blend paint across entire panels and match textures perfectly. For major damage, their work is worth the investment.
That said, for ninety percent of everyday spots, you can handle it yourself. The process is simple, affordable, and satisfying. Once you fix your first spot, you will feel confident tackling the next one.
Preventing Future Damage and Keeping Your Car Looking Great
After you have fixed a spot, you want to keep your car looking good. Here are some simple car maintenance tips to prevent future damage:
- Wash your car regularly to remove dirt and road grime
- Apply wax every three months for paint protection
- Use a car cover if you park outside frequently
- Avoid parking under trees where branches can scratch the paint
- Keep a touch up paint pen in your garage for quick fixes
- Address new chips and scratches immediately before rust sets in
These habits go a long way in protecting your car’s finish. Prevention is always easier and cheaper than repair. A little care today saves you big money down the road.
Also, consider applying a clear bra or paint protection film to high-impact areas like the front bumper and hood. These clear layers absorb the hit from road debris and keep your original paint intact. Many drivers swear by this simple step for long-term paint health.
Final Thoughts on Touching Up Spots
So, how do you touch up a spot on a car the simple way? Now you know the answer. Clean the area, sand lightly, apply thin layers of matching paint, let it cure, and blend it out. It is a straightforward process that anyone can do at home.
Your car paint chip repair does not have to be expensive or stressful. With the right paint touch up kit and a little time, you can make your car look fresh again. Do not let small spots turn into big rust problems. Take action today and protect your investment.
Remember, the key to a great automotive touch up is patience and prep. Do not rush. Take your time, follow the steps, and enjoy the results. Your car will thank you for it.
Frequently Asked Questions
Can I use a regular paint pen for car scratch repair?
Regular paint pens are not designed for automotive use and usually have poor color matching. Always use a paint touch up kit specifically made for cars and matched to your vehicle’s paint code. This ensures the repair blends in properly and lasts longer.
How long does a touch up repair last?
A properly done spot repair car job can last for years if the area stays protected. Waxing the repaired section and keeping it clean helps maintain the finish. However, if the chip was deep and exposed bare metal, rust may eventually form if the repair was not done correctly.
Do I need to sand before applying touch up paint?
Yes, sanding is an important step. Lightly sanding the edges of the damaged area creates a rough surface that helps the automotive touch up paint adhere better. Use fine grit sandpaper (1500 or higher) and sand gently in one direction.
What if the touch up paint color does not match perfectly?
Minor color differences often become less noticeable after blending with rubbing compound and applying a clear coat. If the mismatch is significant, double-check your paint code. You can also visit a dealership or auto parts store to confirm the correct match for your car paint matching needs.
Is it safe to drive after touching up a spot?
You can drive the car right away, but avoid washing it or exposing the repaired area to rain for at least twenty-four hours. The paint needs time to cure fully. Once cured, the repair is durable enough for normal driving and weather exposure.
Can I touch up rust spots myself?
You can fix small surface rust spots with a touch up kit, but you must first remove all the rust with sandpaper or a rust remover. For deep or widespread rust, professional car body repair is recommended to ensure the damage does not return and spread further.
=== CONCLUSION ===
Touching up a spot on your car is one of the easiest and most rewarding DIY tasks you can do. It protects your vehicle from rust, keeps it looking sharp, and saves you real money. With the right touch up paint, a few basic tools, and a little patience, you can handle most small chips and scratches in under an hour.
Remember that car scratch repair works best when you act fast. Do not let small spots sit and worsen over time. Keep a paint touch up kit in your garage, and you will always be ready for the next little blemish. Your car deserves the care, and you deserve the confidence that comes with a clean, well-maintained vehicle.