Can You Replace Just One Headlight Here Is The Full Answer
Can You Replace Just One Headlight? Yes, you can, but you must consider safety, legal rules, and bulb matching. This guide gives you the full answer with step-by-step instructions, expert tips, and common mistakes to avoid. You will learn how to do the job right and keep your night driving safe.
You are driving home on a dark road when you notice one headlight is noticeably dimmer or completely dark. Your first thought might be, Can You Replace Just One Headlight? The answer is yes, but the full story involves a few important details that many drivers overlook. Replacing a single headlight bulb is a common maintenance task, yet it raises questions about safety, legality, and matching the old bulb perfectly. This guide walks you through every aspect of single headlight replacement so you can make a confident, informed decision.
Whether your headlight failed due to a blown filament, moisture damage, or simple age, you do not need to replace both units at once. In most vehicles, the headlight system is designed so each bulb operates independently. You can swap out just the dead bulb and keep driving safely. However, you must choose the right replacement and ensure the new bulb matches the existing one in brightness, color, and beam pattern. This article covers the full can you replace just one headlight answer, from legal considerations to practical step-by-step instructions.
Key Takeaways
- You can replace just one headlight: It is physically possible and often necessary after a single bulb burns out.
- Check your local laws: Many regions require both headlights to match in type and brightness to avoid tickets.
- Match the bulb exactly: Use the same OEM or aftermarket specification to keep color temperature and beam pattern consistent.
- Follow a simple process: You only need basic tools, about 15 to 30 minutes, and a few safety precautions.
- Avoid mismatched lighting: Different bulbs can cause uneven road illumination and glare for oncoming drivers.
- Consider the whole assembly: If the housing is cracked or foggy, replacing the entire unit may be a better long-term fix.
- Test after installation: Always check the new headlight alignment and brightness before hitting the road.
📑 Table of Contents
- Why You Might Need to Replace Just One Headlight
- Can You Replace Just One Headlight? The Short Answer
- Step-by-Step Guide to Replacing a Single Headlight
- Matching the New Headlight to the Existing One
- Common Mistakes to Avoid When Replacing One Headlight
- When to Replace the Entire Headlight Assembly Instead
- Final Thoughts and Expert Tips
Why You Might Need to Replace Just One Headlight
Headlight bulbs have a finite lifespan. A halogen bulb might last 450 to 1,000 hours, while an LED headlight can run for 30,000 hours or more. Even with proper care, one bulb can fail long before the other. Common reasons include normal wear, voltage spikes, moisture intrusion, or physical impact from road debris. When a single bulb goes out, you are left with one working headlight and a potential safety risk. Replacing only the failed unit saves money and time compared to changing both sides.
Some drivers assume they must replace both headlights together. This is a myth. Automakers design vehicles with independent bulb circuits so you can replace just one. The headlight assembly on each side operates separately. You will find a headlight fuse and wiring harness dedicated to each side. If one side blows, the other continues to work normally. This design gives you the flexibility to do a single headlight replacement without affecting the entire lighting system.
Common Causes of Single Headlight Failure
Understanding why one headlight dies helps you prevent future failures. The most frequent causes are:
- Normal bulb life: Halogen and H7 bulb types wear out over time. The filament thins until it breaks.
- Voltage irregularities: A faulty alternator or bad ground can send inconsistent power, shortening bulb life.
- Moisture in the housing: A cracked seal or damaged headlight connector lets water in, corroding the bulb base.
- Physical damage: Debris from the road can crack the headlight housing or break the bulb glass.
- Corroded wiring: The wiring harness connector can oxidize, causing intermittent or complete failure.
Can You Replace Just One Headlight? The Short Answer
The direct answer to Can You Replace Just One Headlight? is a clear yes. You can remove the failed bulb and install a new one without touching the other side. This applies to halogen, LED headlight, and even some HID headlight systems. The process is straightforward and does not require specialized tools in most cases. You simply access the back of the headlight assembly, unplug the old bulb, and plug in the new one.
However, the short answer comes with a few important conditions. You must match the replacement bulb to the original specifications. The OEM headlight part number tells you the exact bulb type, wattage, and beam pattern. Using a different bulb can create mismatched headlights, which may be illegal and unsafe. Always check your vehicle owner’s manual or the existing bulb marking before purchasing a replacement.
Legal and Safety Considerations
Before you grab a new bulb, consider the legal side. Many states and countries have headlight regulations that require both lights to be the same type and color. For example, if your driver side has a halogen headlight and you replace the passenger side with an LED headlight, you could be stopped for mismatched lighting. Some jurisdictions define illegal modifications as any change that alters the stock beam pattern or color temperature. Safety is another major concern. Driving with one working headlight reduces your visibility and makes your vehicle harder for others to see at night. Replace the dead bulb as soon as possible to maintain proper road visibility and driving safety.
Step-by-Step Guide to Replacing a Single Headlight
Doing the job yourself saves money and gives you confidence. The following steps apply to most common vehicles with replaceable bulb assemblies. Always consult your specific vehicle service manual for any unique steps.
Tools You Will Need
Gather these items before you start:
- Replacement bulb matching the OEM part number
- Clean gloves or a microfiber cloth
- Flathead screwdriver or trim removal tool
- Electrical contact cleaner spray
- Owner’s manual for bulb location reference
Removing the Old Bulb
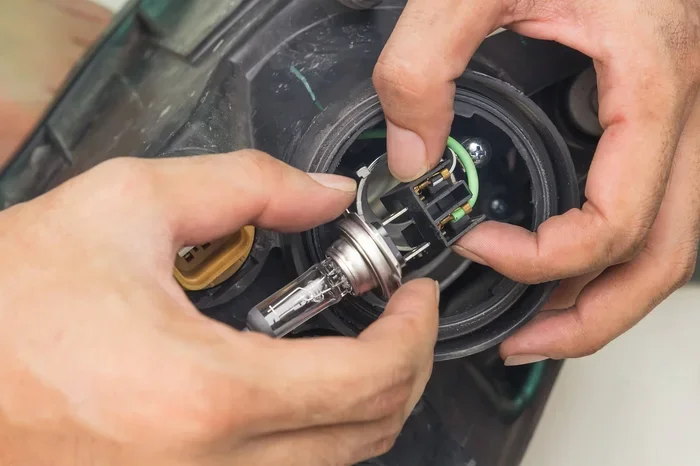
Open the hood and locate the back of the headlight assembly. You will see a plastic cover or a wiring connector. Disconnect the electrical plug by pressing the release tab. Do not pull on the wires; grip the connector firmly. Next, remove any retaining clips or screws holding the headlight housing in place. Carefully pull the assembly forward enough to access the bulb socket. Twist the old bulb socket counterclockwise and pull it straight out. Remove the old bulb from the socket, taking care not to touch the glass with bare fingers. Oils from your skin can create hot spots and shorten the new bulb’s life.
Installing the New Bulb
Put on clean gloves and handle the new headlight bulb by the plastic base. Insert the bulb into the socket, making sure it sits securely. Push the socket back into the assembly and twist clockwise to lock it. Reconnect the electrical plug until you hear a click. Check that the headlight connector is firmly seated. Reinstall any retaining clips or screws. Repeat the process on the opposite side if needed, but remember you only need to replace the failed bulb. Turn on the ignition and test the new light before closing the hood.
Matching the New Headlight to the Existing One
One of the biggest concerns with single headlight replacement is matching the old bulb. You want both headlights to produce the same headlight brightness and color. A mismatch can create a distracting glare or uneven road illumination. Here is how to ensure a perfect match.
Color Temperature and Brightness
Bulb color temperature is measured in Kelvin. A standard halogen bulb emits a warm yellow light around 3,000K. If you replace it with an LED headlight rated at 6,000K, you will get a stark blue-white beam. The difference is obvious at night. To avoid mismatched headlights, choose a replacement bulb with the same color temperature and lumen output as the original. Check the packaging for the Kelvin rating and lumens. If your vehicle came with a halogen headlight, buy a halogen replacement of the same wattage. If you want to upgrade, replace both sides together to keep the lighting balanced.
Avoiding Mismatched Lighting
Even if two bulbs have the same color temperature, their beam patterns can differ. An aftermarket LED headlight might focus light differently than the stock OEM headlight. This can blind oncoming drivers or leave dark spots in your own lane. The best practice is to stick with the same brand and model as the original. If you must use a different bulb, ensure it is DOT or ECE approved and designed for your specific vehicle. After installation, check the headlight alignment on a flat wall. Adjust the aim screws if one light appears higher or wider than the other.
Common Mistakes to Avoid When Replacing One Headlight
Even a simple headlight replacement can go wrong if you skip steps or make assumptions. Avoid these common errors to get a clean, safe result.
Forgetting to Reset the Light Timer
Some modern vehicles have a automatic light timer or a headlight leveling system. After replacing the bulb, you may need to reset the system. Check your owner’s manual for instructions on resetting the headlight timer or headlight alignment sensor. Failing to do so can cause the lights to stay on when the ignition is off or trigger a dashboard warning.
Ignoring the Wiring and Connector
When you pull the old bulb out, inspect the headlight connector and wiring harness. Look for green corrosion, melted plastic, or loose pins. A bad connection can cause the new bulb to flicker or fail prematurely. Use electrical contact cleaner to clean the connector pins before plugging in the new bulb. If the connector is damaged, replace it entirely to ensure a solid electrical connection.
Touching the New Bulb Glass
This mistake shortens bulb life dramatically. The oils from your fingers create hot spots on the halogen or LED bulb glass. These hot spots cause uneven heating and can crack the bulb or reduce its brightness. Always handle bulbs by the plastic base or use a clean microfiber cloth. If you accidentally touch the glass, wipe it clean with rubbing alcohol before installation.
When to Replace the Entire Headlight Assembly Instead
Sometimes replacing just the bulb is not enough. You should consider a full headlight assembly replacement if the housing is damaged or the lens is severely degraded.
Cracked or Damaged Housing
A cracked headlight housing lets moisture in, which fogs the lens and corrodes the internal reflector. You might see water droplets inside the assembly or notice the light appears dim even with a new bulb. In this case, swapping the bulb alone will not fix the problem. A new headlight assembly restores the proper seal and reflector condition. You can buy an OEM or quality aftermarket assembly for a reasonable price.
Upgrading to LED or HID
If you want better headlight brightness and a modern look, upgrading to an LED headlight or HID headlight is an option. But remember, you must replace both sides at the same time. Installing a single LED bulb next to an old halogen creates an uneven and potentially illegal setup. A full assembly upgrade ensures consistent color, pattern, and brightness across both headlights. This approach also future-proofs your lighting system and improves night driving safety.
Final Thoughts and Expert Tips
So, can you replace just one headlight? Absolutely. The process is simple, affordable, and safe when done correctly. The key is to match the replacement bulb exactly, check local laws, and take a few basic precautions. You do not need to be a mechanic to do this job. With the right bulb and a few minutes, you can restore full road visibility and avoid tickets for mismatched headlights.
Always keep a spare bulb in your glove box. A headlight can fail at the worst possible moment, and having a replacement on hand saves you from a long wait on the side of the road. Test both headlights regularly and clean the lenses with a headlight restoration kit to maintain maximum brightness. If you ever feel unsure, a quick visit to a trusted auto parts store or mechanic can confirm the correct bulb and procedure. Taking care of your headlight system is a small effort that pays off in safety and peace of mind every time you drive at night.
Final Key Takeaways
- Replace just one headlight when a single bulb fails, but match it exactly.
- Check local laws to ensure your replacement meets regulations.
- Use clean gloves and avoid touching the bulb glass.
- Inspect wiring and connectors before installing the new bulb.
- Consider a full assembly replacement if the housing is cracked or foggy.
- Upgrade both sides together if you switch to LED or HID technology.
- Test alignment and brightness after every headlight replacement.
Frequently Asked Questions
Is it illegal to replace just one headlight?
In most places, replacing a single headlight with the same OEM bulb is perfectly legal. However, if your local law requires both headlights to match in type and color, you must ensure the replacement is identical. Check your state or country’s vehicle code to avoid a citation. A mismatched setup, such as one halogen and one LED, often violates lighting regulations.
Will replacing one headlight affect the other one?
No, the two headlights operate on independent circuits. Each side has its own headlight fuse, wiring harness, and headlight connector. Replacing one bulb does not impact the other. In fact, if both bulbs are the same age, you might notice the second one fails soon after. This is normal wear and not caused by the replacement.
Can I use an LED bulb to replace a halogen headlight?
You can, but it is best to replace both sides if you make the switch. A single LED next to a halogen creates a color and brightness mismatch. The LED will look much whiter and brighter, which can blind other drivers and fail inspection. If you want an LED upgrade, plan to replace both headlight bulbs and verify the assembly is compatible with LED technology.
How long does it take to replace one headlight?
For most vehicles, the job takes 15 to 30 minutes. You need to access the back of the assembly, unplug the old bulb, and plug in the new one. Some cars have a tight engine bay or hidden clips that add a few minutes. If you have never done it before, watch a quick video specific to your car model to save time and avoid frustration.
What happens if I do not replace a dead headlight?
Driving with one working headlight reduces your visibility and makes your vehicle harder for others to see. It increases the risk of a nighttime accident. Many police departments treat a single headlight as a moving violation, which can result in a ticket. Beyond the legal risk, a dead bulb leaves you with poor road visibility in dark or poorly lit areas. Replace it promptly for safety.
Do I need to adjust the headlight alignment after replacing one bulb?
Yes, always check the alignment. Even if you install an identical OEM bulb, the new filament may sit slightly differently in the reflector. Park your car facing a flat wall and turn on the lights. Compare the beam patterns on both sides. If one light is higher or off-center, adjust the headlight alignment screws on the assembly until both beams match perfectly. Proper alignment prevents glare and ensures even road illumination.