Car Dashboard Leather Wrap Makeover Ideas You Will Love
A car dashboard leather wrap is one of the most impactful ways to upgrade your vehicle’s interior. This guide covers creative makeover ideas, the best materials, and a full step-by-step installation process. You will learn how to prep your surface, choose the right leather, and avoid common mistakes. Whether you want a sporty or luxurious feel, a leather dashboard wrap delivers stunning results.
Key Takeaways
- Leather dashboard wraps instantly elevate your car’s interior with a premium, customized look.
- Multiple material options exist, including genuine leather, synthetic leather, and vinyl blends.
- Surface prep is the most important step for a bubble-free, long-lasting wrap.
- Creative color and texture combinations let you design a dashboard that matches your style.
- Regular maintenance keeps your leather wrap looking great for years.
- DIY installation is doable with the right tools and patience.
- Hiring a professional is worth it for complex dashboard shapes or high-end finishes.
📑 Table of Contents
- Why a Car Dashboard Leather Wrap Makes Your Interior Look Amazing
- Best Materials for a Dashboard Leather Wrap
- Creative Dashboard Leather Wrap Makeover Ideas
- Step-by-Step Guide to Wrapping Your Dashboard
- Common Mistakes to Avoid When Wrapping a Dashboard
- How to Maintain Your Leather Dashboard Wrap
- Should You DIY or Hire a Professional for Your Dashboard Wrap?
- Final Thoughts on Car Dashboard Leather Wrap Makeovers
Why a Car Dashboard Leather Wrap Makes Your Interior Look Amazing
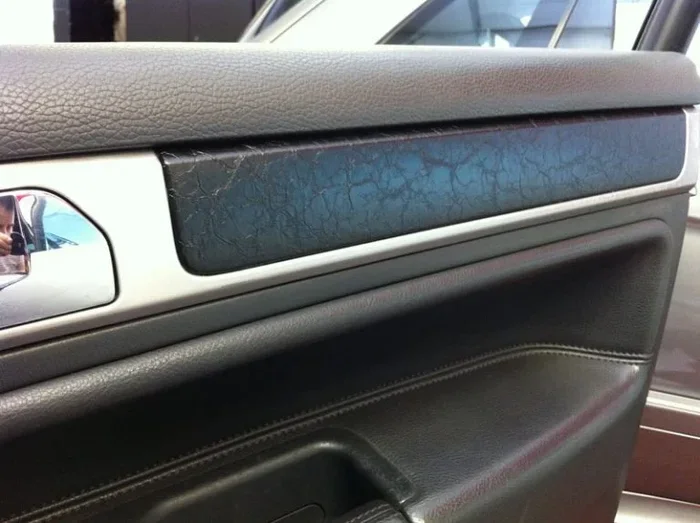
Your car dashboard takes a beating every single day. Sunlight fades the plastic. Heat cracks the surface. Over time, it just looks old and tired. A car dashboard leather wrap is an easy and affordable way to bring your interior back to life.
Unlike a full dashboard replacement, a leather wrap is non-invasive. You do not need to remove any original parts. The wrap simply goes over your existing surface. This makes it a favorite among car enthusiasts who want a luxury car interior makeover without the huge price tag.
Think about it. A leather-wrapped dashboard gives your car a high-end feel. It looks like something you would find in a luxury sedan. But you can achieve this look in your daily driver too. The transformation is dramatic and the process is simpler than you might think.
Beyond looks, a leather wrap also protects your dashboard. It shields the surface from UV rays, heat, and everyday wear. So you get beauty and function in one upgrade. That is a win-win situation for any car owner.
In this article, we will explore the best dashboard leather wrap ideas, the materials you can choose from, and how to install one yourself. By the end, you will have everything you need to start your own car interior transformation project.
Who Should Consider a Dashboard Leather Wrap?
Anyone who drives regularly can benefit from this upgrade. If your dashboard looks faded or scratched, a wrap hides all those flaws. Car owners with older vehicles especially love this trick. It makes the interior feel brand new again.
Even if your dashboard is in good shape, a leather wrap adds a personal touch. You get to choose the color, the texture, and the finish. It is one of the best car customization ideas available today. The best part? It costs a fraction of what a professional interior redo would cost.
Best Materials for a Dashboard Leather Wrap
Not all leather wraps are the same. The material you pick affects the look, feel, and durability of your finished dashboard. Let us break down the most popular options so you can make the right choice.
Genuine Leather
Genuine leather is the top choice for a premium feel. It has a natural grain and a rich smell that synthetic options cannot match. A genuine leather dashboard wrap gives your car a truly luxurious appearance.
However, genuine leather comes with a higher price tag. It also requires more maintenance. You will need to condition it every few months to keep it soft and supple. If you want the best of the best, genuine leather is worth the investment.
Synthetic Leather (PU Leather)
Synthetic leather, also called PU leather, is a popular alternative. It looks very similar to real leather but costs much less. Many car dashboard leather wrap kits use PU leather because it is durable and easy to work with.
PU leather resists water and stains better than genuine leather. It is also easier to clean. For most DIY projects, synthetic leather hits the sweet spot between quality and affordability. It is a great option if you want a leather look without the leather price.
Vinyl and Leather-Blend Wraps
Vinyl wraps are the most budget-friendly option. They come in many colors and textures. Some vinyl wraps even mimic the look of stitched leather. A leather-look dashboard cover made from vinyl can still look fantastic.
Leather-blend wraps combine real leather fibers with synthetic materials. They offer a natural feel at a mid-range price point. These blends are becoming more popular in the car interior detailing world. They give you a nice balance of comfort and durability.
Quick Comparison of Materials
- Genuine Leather: Premium look, high cost, needs regular conditioning.
- Synthetic Leather (PU): Affordable, durable, easy to clean, great for DIY.
- Vinyl: Budget-friendly, wide color range, slightly less realistic feel.
- Leather Blend: Natural feel, mid-range price, good durability.
Creative Dashboard Leather Wrap Makeover Ideas
Now comes the fun part. Choosing a design for your car dashboard leather wrap is where you can really express your personality. Here are some popular makeover ideas that are trending right now.
Full Black Leather Wrap for a Classic Look
Black leather is timeless. It matches almost any car color and interior style. A full black dashboard wrap gives your car a sleek, sophisticated appearance. It is the most popular choice among car owners for a reason.
If your car has a lot of hard plastic, a black leather wrap softens the entire look. It makes the cabin feel warmer and more inviting. Pair it with black leather seat covers for a cohesive interior theme. This classic approach never goes out of style.
Two-Tone Leather Wrap for a Sporty Feel
Two-tone designs are trending hard in the car interior design world. You can combine black with red, black with cream, or black with tan. The contrast adds depth and visual interest to your dashboard.
For a sporty look, try black with red accents around the gauge cluster. For a more refined vibe, pair black with tan across the entire top panel. Two-tone wraps make your dashboard a real focal point. Guests will notice the detail the moment they step inside.
Embossed or Textured Leather for Added Luxury
Plain leather is great, but textured leather takes it to the next level. Embossed leather wraps feature patterns like diamond stitching or crosshatch textures. These details make your dashboard look like it belongs in a luxury vehicle.
Textured wraps also hide minor imperfections better than smooth leather. If your dashboard has small scratches or uneven surfaces, a textured wrap can disguise them well. Look for embossed leather dashboard skins at your local auto parts store or online retailer.
Custom Color Matching to Your Car
Want your dashboard to match your car’s interior perfectly? Custom color matching is the way to go. Many wrap suppliers offer custom dye services. You can pick an exact shade that complements your seats, trim, and door panels.
This is one of the most underrated car makeover ideas out there. A perfectly matched interior creates a seamless, cohesive look. It shows attention to detail that even luxury car brands appreciate. If you really want your car to stand out, go custom.
Adding Perforations for a Premium Touch
Perforated leather is a signature of premium car interiors. Those tiny holes across the leather surface are not just decorative. They also improve breathability and add a refined texture.
Some wrap kits come with pre-perforated options. You can also buy perforated leather sheets and cut them to fit your dashboard. This small detail makes a big difference. It elevates the entire look from “nice” to “wow.”
Step-by-Step Guide to Wrapping Your Dashboard
Wrapping your dashboard is a satisfying DIY project. You do not need professional skills to get great results. Follow these steps carefully, and your dashboard leather wrap will look like it was done by a pro.
Step 1: Gather Your Tools and Supplies
Before you start, make sure you have everything ready. Here is a checklist of what you need:
- Leather wrap material (cut to size with extra margin)
- Dashboard cleaning solution or isopropyl alcohol
- Microfiber cloths
- Heat gun or hair dryer
- Plastic trim tools or a spatula
- Spray bottle with soapy water
- Sharp utility knife or scissors
- Leather adhesive (if not using a self-adhesive wrap)
Having everything at hand before you start saves time and frustration. Do not skip the heat gun. It is essential for getting tight corners and smooth edges.
Step 2: Clean and Prep the Dashboard Surface
Surface prep is the most important part of the entire process. If your dashboard is dirty or greasy, the wrap will not stick properly. Start by wiping down the entire surface with a microfiber cloth dampened with isopropyl alcohol.
Pay extra attention to the area around vents, buttons, and screens. Use a cotton swab to get into tight spaces. Let the dashboard dry completely before moving to the next step. Any moisture left behind can cause bubbles under the wrap.
Quick Tip: If your dashboard has a lot of texture or pores, consider using a primer designed for wrap applications. It helps the adhesive bond more evenly.
Step 3: Measure and Cut the Leather Wrap
Lay your leather wrap flat on the dashboard. Start from the center and work your way outward. Leave about one to two inches of extra material on all edges. You can trim the excess later.
Use a soft pencil to mark curves and contours directly on the leather. This makes cutting much easier. Cut slowly and follow your marks carefully. A sharp blade gives you the cleanest edges.
Step 4: Apply the Wrap Using the Soapy Water Method
Spray a light mist of soapy water onto the dashboard surface. This acts as a lubricant and gives you time to adjust the leather. Lay the leather wrap onto the wet surface carefully.
Start from the center and push outward. Use a plastic trim tool to smooth out any air bubbles. Work slowly and patiently. Rushing this step leads to wrinkles and uneven edges.
Step 5: Use Heat to Shrink and Smooth the Wrap
Once the wrap is in place, use your heat gun on a low setting. Hold it about six inches from the surface. Move it slowly across the leather. The heat causes the material to shrink and conform to every curve and contour.
Focus on corners, edges, and areas around vents. These spots tend to be the trickiest. Apply heat evenly and do not linger in one spot too long. You do not want to damage the leather or the dashboard underneath.
Step 6: Trim the Excess Material
After the wrap is fully applied and smooth, use a sharp utility knife to trim the excess material. Go slowly along the edges. A steady hand gives you the cleanest finish.
Tuck any remaining edges behind trim pieces or vents where possible. This hides the raw edge and gives a seamless look. Step back and admire your work. A well-done leather wrap looks absolutely stunning.
Step 7: Let It Cure and Condition
Allow the wrap to sit undisturbed for at least 24 hours. This lets the adhesive set fully. After curing, apply a leather conditioner to keep the material soft and supple.
Conditioning also adds a subtle shine that enhances the overall look. Make this part of your regular car interior detailing routine. A little maintenance goes a long way in preserving your wrap.
Common Mistakes to Avoid When Wrapping a Dashboard
Even with the best intentions, mistakes happen during dashboard wrap projects. Knowing what to avoid saves you time, money, and frustration. Here are the most common errors people make.
Skipping Surface Preparation
This is the number one mistake. A dirty or dusty dashboard causes the wrap to peel and bubble. Always clean thoroughly and let the surface dry completely. Skipping this step is the fastest way to ruin your wrap job.
Using Too Much Heat
Heat is your friend, but too much of it is harmful. Excessive heat can warp the dashboard plastic or scorch the leather. Keep the heat gun moving at all times. Use the lowest effective setting and build up gradually.
Cutting the Wrap Too Small
Always leave extra material when you cut the wrap. It is much easier to trim excess than to stretch a piece that is too small. Measure twice and cut once. This old rule applies perfectly to dashboard wrapping.
Ignoring Air Bubbles
Small air bubbles might seem harmless at first. But over time, they grow and become very noticeable. Use your plastic trim tool to push bubbles toward the edges as you apply the wrap. Do not ignore them, no matter how small.
Choosing the Wrong Material
Not every wrap material works well on dashboards. Some materials are too thick to conform to curves. Others have adhesives that leave residue. Always choose a wrap specifically designed for automotive interior use. Read reviews and check the product specifications before you buy.
How to Maintain Your Leather Dashboard Wrap
A leather dashboard wrap is a long-term investment. With proper care, it can last for five years or more. Maintenance is simple but consistent.
Regular Cleaning
Wipe your dashboard down weekly with a damp microfiber cloth. This removes dust and prevents buildup. For deeper cleaning, use a leather-safe cleaner. Avoid harsh chemicals or ammonia-based products. They can dry out and crack the leather over time.
Conditioning Schedule
Condition your leather wrap every two to three months. This keeps the material supple and prevents cracking. Apply a thin layer of leather conditioner with a soft cloth. Buff it in gently using circular motions.
Expert Insight: UV-protective leather conditioners are the best choice for dashboard wraps. They add a layer of protection against sun damage. This is especially important if your car spends a lot of time parked outdoors.
Avoiding Common Damage
Keep your dashboard away from direct sunlight when possible. Use a sunshade on the windshield when parked. This simple habit extends the life of your leather wrap significantly. Also, avoid placing sharp objects directly on the wrapped surface.
Dealing with Minor Wear Over Time
Even with great care, minor wear may appear over the years. Small scuffs can be buffed out gently. If a section starts to peel, you can apply a small amount of leather adhesive to reattach it. For larger damage, a local wrap repair kit can do the trick.
Remember, a leather wrap is designed to be replaceable. Unlike a permanent dashboard modification, you can remove and reapply a wrap whenever needed. This makes it a flexible and forgiving upgrade option.
Should You DIY or Hire a Professional for Your Dashboard Wrap?
This is a question many car owners ask before starting a wrap project. The answer depends on your skill level, budget, and the complexity of your dashboard.
When DIY Makes Sense
If you have basic DIY experience and a straightforward dashboard shape, going the DIY route is a great choice. It saves you money and gives you full creative control. Many car owners complete their first wrap in just a few hours.
Start with a simple design and a basic material like PU leather. As you gain confidence, you can tackle more complex projects. The satisfaction of wrapping your own dashboard is hard to beat.
When to Hire a Professional
Complex dashboard shapes with many curves, vents, and screens can be challenging to wrap yourself. If your dashboard has a lot of contours, consider hiring a professional. A skilled installer can achieve a flawless finish on even the most difficult surfaces.
Professional installation typically costs between $200 and $800 depending on your vehicle and the material used. If you are going for a premium leather dashboard finish, the professional touch is well worth the investment. You also avoid the risk of damaging your dashboard during a DIY attempt.
Final Thoughts on Car Dashboard Leather Wrap Makeovers
A car dashboard leather wrap is one of the most effective and affordable ways to transform your vehicle’s interior. It protects your dashboard, enhances the look, and adds resale value to your car. Whether you choose a classic black wrap or a bold two-tone design, the results speak for themselves.
The key to a successful wrap is preparation. Clean your surface thoroughly, choose the right material, and take your time during application. Do not rush the process. A careful, patient approach gives you the best results.
Once your wrap is installed, keep up with regular maintenance. Clean it gently and condition it often. Your leather-wrapped dashboard will look great for years to come. It is an upgrade that truly pays off every time you get behind the wheel.
So go ahead and give your car the makeover it deserves. A leather dashboard wrap is a small change that makes a huge difference. Your car interior will thank you for it.
Frequently Asked Questions
How long does a car dashboard leather wrap last?
A well-maintained leather dashboard wrap can last between three and seven years. Genuine leather wraps tend to last longer than synthetic options. Regular conditioning and protection from direct sunlight significantly extend the lifespan of your wrap.
Can I remove a leather dashboard wrap without damaging the dashboard?
Yes, most automotive leather wraps are designed to be removable without leaving residue. The adhesive used in quality wrap kits is specifically formulated for clean removal. However, prolonged exposure to extreme heat may make removal slightly more difficult.
How much does it cost to wrap a car dashboard with leather?
The cost varies depending on the material and whether you DIY or hire a professional. DIY kits typically range from $50 to $200. Professional installation can cost between $200 and $800. Synthetic leather options are the most budget-friendly choice for most car owners.
Is a leather dashboard wrap safe for car electronics and vents?
Yes, when installed correctly, a leather wrap does not interfere with electronics or vent function. You simply cut openings around vents, buttons, and screens before applying the wrap. Always use a heat gun carefully near electronic components to avoid damage.
What is the best color for a leather dashboard wrap?
Black is the most popular and versatile color for a leather dashboard wrap. It hides wear well and matches almost any interior color scheme. However, two-tone designs with cream, tan, or red accents are gaining popularity for a more customized look.
Can I wrap my dashboard myself if I have never done it before?
Absolutely. Dashboard wrapping is a beginner-friendly DIY project as long as you follow the steps carefully. Start with a simple design and practice on a small area first. Many first-time DIYers achieve professional-looking results with patience and the right tools.
=== CONCLUSION ===
A car dashboard leather wrap is a simple yet powerful way to refresh your vehicle’s interior. It offers protection, style, and a premium feel at a fraction of the cost of a full interior overhaul. Whether you go with a classic black wrap or a creative two-tone design, the transformation is immediate and impressive.
Choose your material wisely, prep your surface thoroughly, and take your time during installation. The results will speak for themselves. Keep your wrap maintained with regular cleaning and conditioning, and it will continue to look great for years. Start your dashboard leather wrap makeover today and enjoy a car interior that turns heads every time you drive.