How Do You Take a Hubcap Off Without Any Hassle at All
Knowing how do you take a hubcap off is a simple skill every car owner should have. Whether you need to clean your wheels, check your tire pressure, or replace a damaged hubcap, the process is easier than most people think. This guide walks you through every method, tool, and tip you need to remove a hubcap without any hassle at all.
You are standing in your driveway, staring at a dirty or damaged hubcap, and you have no idea how to get it off. Maybe you need to clean the wheel cover, check the tire valve stem, or replace a broken piece. Whatever the reason, the question is the same: how do you take a hubcap off without scratching your rim or breaking the clip?
The good news is that removing a hubcap is one of the easiest car maintenance tasks you can do. You do not need a mechanic. You do not need expensive tools. With the right approach and a little patience, you can pop off any hubcap removal job in under five minutes. This guide covers every type of hubcap, every tool you might need, and every step from start to finish.
Let us get into it. By the end of this article, you will feel confident walking up to any wheel and removing the cover like a pro.
Key Takeaways
- Different hubcap types need different removal methods: snap-on, screw-on, and clip-on hubcaps each require a specific approach.
- Basic tools make the job simple: a flathead screwdriver, pry tool, and lug wrench are all you need in most cases.
- Safety comes first: always work on a flat surface and let the car cool before removing hubcaps.
- Avoid common mistakes: using the wrong tools or excessive force can damage your wheel cover or tire valve stem.
- Reinstallation matters too: proper alignment and secure fasteners keep your hubcap in place for the long haul.
- Preventive care extends hubcap life: regular cleaning and inspection help you spot problems early.
📑 Table of Contents
- Understanding Your Hubcap Type
- Tools You Will Need for Hubcap Removal
- Step-by-Step Guide: How Do You Take a Hubcap Off
- Common Mistakes to Avoid When Removing a Hubcap
- Tips for Reinstalling Your Hubcap
- When to Replace Your Hubcap Instead of Reusing It
- Expert Tips for Easy Hubcap Removal
- Frequently Asked Questions About Hubcap Removal
- Final Thoughts
Understanding Your Hubcap Type
Not all hubcaps are the same. Before you start, you need to know what type of wheel cover you are dealing with. Different hubcaps use different fastening systems. Knowing which one you have saves you time and prevents damage.
Snap-On Hubcaps
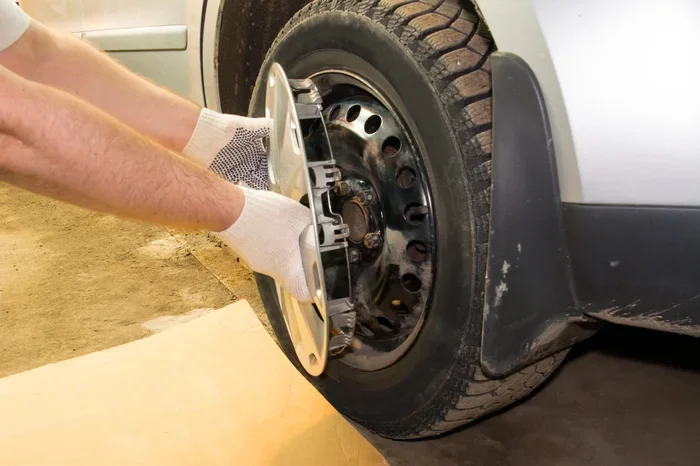
Snap-on hubcaps are the most common type. They use spring clips around the edges to hold the cover in place. You will find these on many older vehicles and some newer economy cars. To remove a snap-on hubcap, you simply pry it off by pulling the clips loose. These are the easiest to remove, and they do not require any special tools beyond a pry tool or a flathead screwdriver.
Screw-On Hubcaps
Screw-on hubcaps attach directly to the wheel rim using screws or bolts. You will often see these on trucks, SUVs, and some luxury vehicles. The center cap screws into the lug nut area of the wheel. To remove a screw-on hubcap, you need a wrench or a socket set. These are more secure than snap-on caps but still very manageable to remove at home.
Clip-On Hubcaps
Clip-on hubcaps use a metal or plastic ring that clips over the tire rim. The retention system relies on a series of small clips or a retaining ring. These are common on modern alloy wheel designs that use a full wheel cover instead of a traditional hubcap. Removing a clip-on hubcap requires a bit more care because the clips are small and can break if you use too much force.
Chrome and Decorative Hubcaps
Chrome hubcaps and decorative wheel covers often look the same as standard snap-on or screw-on models but may have a more delicate finish. If you have a chrome hubcap, be extra gentle during removal. Use a cloth between your prying tool and the cap to prevent scratches. The removal process is the same, but the finish requires more care.
Tools You Will Need for Hubcap Removal
One of the best things about removing a hubcap is that you probably already own the tools you need. You do not need a fancy garage setup. Here is a list of the most common tools for hubcap removal:
- Flathead screwdriver: The go-to tool for prying off snap-on hubcaps.
- Pry tool set: Plastic or metal pry tools work great and reduce the risk of scratching.
- Lug wrench: Essential for screw-on hubcaps that attach to the lug nut area.
- Socket set: Useful for larger screw-on hubcaps found on trucks and SUVs.
- Rubber mallet: Helps loosen stubborn hubcaps without damaging the tire rim.
- Soft cloth or towel: Protects the hubcap finish during removal.
- Gloves: Keeps your hands clean and protects you from sharp edges.
You do not need all of these tools for every job. But having them on hand makes the process smoother. A basic flathead screwdriver and a pair of gloves will get you through most hubcap removal tasks.
Step-by-Step Guide: How Do You Take a Hubcap Off
Now that you know your hubcap type and have your tools ready, let us walk through the actual process. Follow these steps carefully, and you will have that hubcap off in no time.
Step 1: Park on a Flat Surface
Find a flat, level surface to work on. A driveway or a garage floor works best. Make sure the car is parked and the parking brake is engaged. Working on an uneven surface can cause the car to shift, which is dangerous when you are leaning over the wheel.
Step 2: Let the Car Cool Down
If you have been driving, give the wheels time to cool. Hot tire rims and wheel covers can burn your hands. Wait at least 15 to 20 minutes after driving before you start the removal process.
Step 3: Locate the Fastening System
Look closely at the hubcap. Do you see clips around the edge? Screws on the face? A retaining ring on the back? Identifying the fastening system tells you which removal method to use. This is the most important step in the entire process.
Step 4: Remove the Lug Nut Cap (If Applicable)
Some hubcaps have a small plastic or metal cover over the lug nut. Use your flathead screwdriver to pop this cap off. Set it aside in a safe place so you do not lose it. On some vehicles, the center cap itself is the hubcap you are trying to remove.
Step 5: Start Prying or Unscrewing
For snap-on hubcaps, insert your pry tool or flathead screwdriver between the hubcap and the tire rim. Work around the edge, pulling the clips loose one by one. Go slowly. Do not use excessive force.
For screw-on hubcaps, use your wrench or socket to unscrew the fasteners. Turn counterclockwise to loosen. Once all screws are removed, the hubcap should lift right off.
Step 6: Gently Pull the Hubcap Free
Once the clips are loose or the screws are removed, pull the hubcap straight out. Do not twist or bend it. If it feels stuck, tap the edge gently with a rubber mallet. Never use a metal tool to strike the hubcap directly.
Step 7: Inspect the Hubcap and Rim
With the hubcap off, take a moment to inspect both the cover and the wheel rim. Look for cracks, bends, or corrosion. This is also a great time to check your tire valve stem and make sure it is in good condition. Clean any dirt or debris from the rim surface before reinstalling or replacing the hubcap.
Common Mistakes to Avoid When Removing a Hubcap
Even though removing a hubcap is straightforward, people make mistakes all the time. Here are the most common errors and how to avoid them:
- Using the wrong tool: A metal crowbar or sharp object can scratch or crack your hubcap. Stick to plastic pry tools or a soft flathead screwdriver wrapped in a cloth.
- Forcing a stuck hubcap: If the hubcap does not come off easily, do not brute force it. Check for hidden screws or clips. Spraying a little lubricant around the edge can help loosen a stubborn cover.
- Ignoring the lug nut area: Some hubcaps are attached directly to the lug nut assembly. If you do not remove the lug nuts first, you risk damaging both the hubcap and the wheel.
- Working on an uneven surface: This is a safety hazard. Always park on a flat, stable surface before you start.
- Losing the clips or fasteners: Small parts are easy to lose. Keep a small bowl or tray nearby to hold screws, clips, and caps.
Tips for Reinstalling Your Hubcap
Removing the hubcap is only half the job. Proper reinstallation ensures your wheel cover stays secure and looks great. Follow these tips when putting the hubcap back on:
- Align the hubcap correctly: Most hubcaps have a top and bottom. Look for a directional arrow or a marked top. Align it with the valve stem for the best fit.
- Press evenly around the edge: For snap-on hubcaps, press the cover onto the rim evenly all the way around. You should hear the clips click into place.
- Do not overtighten screws: For screw-on hubcaps, tighten the screws firmly but do not strip them. Use a wheel wrench with the right size socket.
- Check for wobble: After reinstalling, give the hubcap a gentle tug. It should feel secure with no movement.
- Clean the rim surface first: A clean tire rim helps the hubcap sit flush and prevents rattling while driving.
When to Replace Your Hubcap Instead of Reusing It
Sometimes removal reveals damage that makes reuse impossible. Here are signs that you should replace your hubcap instead of putting it back on:
- Cracks or breaks: A cracked hubcap will only get worse over time. Driving with a damaged cover can cause it to fly off at speed.
- Severe corrosion: If the metal or plastic is corroded beyond repair, a new wheel cover is the safer choice.
- Broken clips: If the retention clips are damaged, the hubcap will not stay on the alloy wheel properly.
- Bent or warped shape: A hubcap that does not sit flush on the rim can create drag and affect your fuel economy.
Replacing a hubcap is much cheaper than replacing a damaged one or dealing with a loose cover on the highway. Keep spare hubcaps on hand if your vehicle uses a standard size.
Expert Tips for Easy Hubcap Removal
Here are some insider tips that make the whole process even easier:
- Use warm water to loosen a stuck hubcap: Pour warm (not boiling) water around the edge of the hubcap. The heat expands the metal slightly and can break the grip of the clips.
- Mark your lug nuts: Use a small piece of tape or paint to mark which lug nut goes where. This helps during reinstallation and keeps everything organized.
- Keep a hubcap removal kit in your trunk: A small kit with a pry tool, a cloth, and a few spare clips can save you in an emergency.
- Watch YouTube videos for your specific model: Some vehicles have unique hubcap designs. A quick video search for your make and model can show you exactly what to expect.
- Work with a partner: Having someone hold a flashlight or steady the wheel makes the job easier and safer.
Frequently Asked Questions About Hubcap Removal
Can I remove a hubcap without any tools?
Yes, for most snap-on hubcaps, you can use your hands alone if the clips are loose enough. However, a flathead screwdriver or pry tool makes the job faster and safer. Using your bare hands can slip and scratch the wheel cover.
Will removing a hubcap damage my tire valve stem?
Not if you are careful. The tire valve stem is usually located near the center of the wheel. When removing a hubcap, work around the edges first and avoid pulling on the center area. If your valve stem is exposed, simply be mindful of its location as you pry the cover off.
How often should I remove my hubcaps for cleaning?
Every two to four weeks is a good routine for most drivers. Regular cleaning prevents brake dust buildup and keeps your chrome hubcap or wheel cover looking new. If you drive in salty or dirty conditions, clean them more frequently.
What if my hubcap clips are broken?
Broken clips are a common reason hubcaps fall off while driving. You can buy replacement clip kits at any auto parts store for just a few dollars. Installing new clips is simple and takes only a few minutes. Just make sure you get the right kit for your specific hubcap model.
Can I drive without a hubcap?
Yes, you can drive without a hubcap. The hubcap is a cosmetic cover and does not affect the safety or function of your wheel. However, it is best to reinstall it as soon as possible to protect the lug nut area from dirt and moisture buildup.
Is it hard to tell the difference between a hubcap and a wheel?
Yes, many people confuse the two. A hubcap or wheel cover is a removable cosmetic piece that covers the center of the wheel. The actual wheel or alloy wheel is the entire metal structure the tire mounts to. A quick way to tell is that a hubcap does not have the tire bead sitting on it. The tire always mounts to the wheel, not the hubcap.
Final Thoughts
So, how do you take a hubcap off without any hassle at all? The answer is simpler than you think. Know your hubcap type, gather a few basic tools, follow the steps carefully, and avoid the common mistakes. Whether you are dealing with a snap-on, screw-on, or clip-on wheel cover, the process is straightforward and manageable for anyone.
Removing a hubcap is not just about aesthetics. It gives you access to the tire valve stem, lets you inspect the wheel rim, and helps you maintain your vehicle properly. These small moments of hands-on car care build confidence and save you money over time.
Now that you have the knowledge and the steps, go ahead and give it a try. Next time your hubcap needs attention, you will know exactly what to do. No hassle, no stress, and no damage. Just a clean, secure wheel cover that makes your car look its best.