DIY: How to Polish Auto Glass and Restore Clarity Today
DIY polish auto glass is one of the most rewarding and budget-friendly projects you can tackle at home. With the right glass polishing compound, a few basic tools, and this step-by-step guide, you can remove scratches, eliminate haze, and bring back like-new clarity to every window on your vehicle. This guide covers everything from preparation to maintenance so you can restore your auto glass with confidence.
There is something deeply satisfying about bringing your car’s glass back to life. Over time, DIY polish auto glass becomes a necessity rather than a luxury. Sun exposure, road debris, and everyday wear can leave your windows looking dull and cloudy. The good news is that you do not need a professional detailer to fix this.
With the right tools and a bit of patience, you can achieve stunning results right in your garage. Auto glass restoration is easier than most people think, and the cost savings are significant. This guide covers everything you need to know about how to polish auto glass like a pro.
Whether you are dealing with light scratches, swirl marks on glass, or general haze, the steps below will walk you through the entire process. You will learn which products work best, what mistakes to avoid, and how to keep your glass crystal clear for months to come.
Key Takeaways
- Restore Clarity at Home: You do not need expensive professional services to bring your auto glass back to life. Simple tools and a little time go a long way.
- Right Tools Matter: Using the correct polishing pads, orbital polisher, and quality glass polishing compound makes a huge difference in your results.
- Avoid Common Mistakes: Skipping the clean-up phase or using the wrong compound can cause more harm than good. Follow the steps carefully.
- Maintenance Is Key: Regular cleaning and applying a glass sealant keeps your polished glass looking great for months.
- Know When to Call a Pro: Deep chips or cracks cannot be fixed with polishing. Recognizing these limits saves you time and money.
📑 Table of Contents
Why Auto Glass Loses Its Clarity
Before you grab a polishing pad, it helps to understand what is happening to your glass. Clearcoat and glass surfaces take a beating every single day. Tiny particles settle on the surface, and over time they create a cloudy film that dulls your view.
Common Causes of Cloudy Auto Glass
Several factors contribute to hazy or scratched auto glass. Here are the most common culprits:
- UV Damage on Car Windows: Prolonged sun exposure breaks down the surface layer of your glass. This leads to oxidation and a chalky appearance.
- Road Debris and Micro-Marring: Tiny rocks, sand, and dust kicked up from the road create micro-scratches. These are often called swirl marks on glass.
- Hard Water Spots: Rain and car washes leave mineral deposits that bond to the glass surface. Over time, these spots etch into the glass.
- Chemical Etching: Bird droppings, tree sap, and harsh cleaning products can eat into the glass if left too long.
- Aging and Wear: Even with good care, glass naturally degrades over years of exposure to the elements.
Understanding the cause helps you choose the right approach. Light haze and swirl marks respond well to polishing. Deep chips or cracks need a different solution entirely.
Tools and Supplies You Need
Gathering your supplies before you start is essential. You do not need a huge budget, but using the right products makes all the difference. Here is what you will need for a successful DIY auto glass polishing project.
Essential Supplies
- Glass Polishing Compound: A quality compound designed specifically for glass. Look for a fine-grit formula that removes light scratches without damaging the surface.
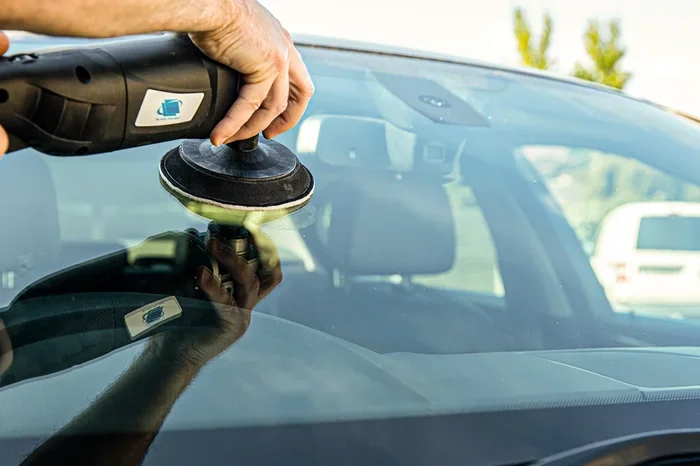
- Orbital Polisher or Dual-Action Polisher: A glass polishing machine ensures even pressure and consistent results. Hand polishing works too, but it takes more effort.
- Polishing Pads: Soft foam pads work best for auto glass. Avoid rough pads meant for paint correction.
- Microfiber Cloths: You need several clean microfiber cloths for applying compound and wiping away residue.
- Automotive Glass Cleaner: A streak-free cleaner prepares the surface before you start polishing.
- Spray Bottle with Water: A simple water and soap solution keeps the pad lubricated during polishing.
- Glass Sealant or Ceramic Coating: This protects your freshly polished glass from future damage.
Comparing Glass Polishing Compounds
Not all polishing compounds are created equal. Here is a quick comparison to help you choose the right one for your windshield polish project.
| Product Type | Best For | Price Range | Skill Level |
|---|---|---|---|
| Basic Scratch Remover | Light surface scratches and haze | $10 – $20 | Beginner |
| Premium Glass Polish | Moderate swirl marks and oxidation | $20 – $40 | Intermediate |
| All-in-One Compound | Light scratches and general clarity | $15 – $30 | Beginner to Intermediate |
| Heavy-Cut Compound | Deep scratches and heavy oxidation | $25 – $50 | Advanced |
For most DIY polish auto glass projects, a basic scratch remover or all-in-one compound works perfectly. Save the heavy-cut compounds for serious damage only.
Step-by-Step: How to Polish Auto Glass
Now that you have your supplies ready, it is time to get to work. Follow these steps carefully for the best auto glass restoration results.
Step 1: Clean the Glass Thoroughly
Start by washing the entire glass surface with water and soap solution and a clean microfiber cloth. Remove all dirt, dust, and grime. Any particles left on the surface can act like sandpaper during polishing and create new scratches.
Use an automotive glass cleaner to remove any stubborn residue. Make sure the glass is completely dry before moving to the next step.
Step 2: Apply the Polishing Compound
Put a small amount of glass polishing compound onto your polishing pad or directly onto the glass. Less is more here. A thin, even layer works best.
If you are hand-polishing, apply the compound to a soft microfiber cloth. If you are using an orbital polisher, apply it to the pad and spread it lightly across the surface.
Step 3: Polish the Glass
Turn on your orbital polisher and work in small sections, about 2 feet by 2 feet. Use gentle, overlapping passes. Keep the polisher moving at all times. Do not let it sit in one spot, as this can overheat the glass.
For hand polishing, use circular motions with moderate pressure. Work the compound into the glass for about 30 seconds per section.
Check your progress frequently. You should start to see the haze and swirl marks fade as the compound works its magic.
Step 4: Wipe Away Residue
Once you have polished a section, use a clean, dry microfiber cloth to wipe away the residue. You will likely see a hazy film left behind. This is normal and simply means the compound has done its job.
Flip your cloth frequently and use a clean section for each wipe. Dirty cloths can reintroduce scratches to the freshly polished surface.
Step 5: Inspect and Repeat if Needed
Step back and look at the glass in good lighting. Check for any remaining scratches or haze. If you still see imperfections, repeat the polishing process on those areas.
Most light to moderate damage requires only one or two passes. Heavy damage may need three or more, but always use a lighter compound first before moving to a heavier one.
Step 6: Apply a Glass Sealant
Once you are happy with the clarity, apply a glass sealant or ceramic coating glass product. This creates a protective barrier that repels water, dirt, and UV rays.
Apply a thin layer with a microfiber cloth and buff it off after it dries. This step extends the life of your clear coat polish results significantly.
Quick Tips and Common Mistakes
Even with the best guide, it is easy to make mistakes when buffing auto glass. Here are some quick tips and pitfalls to watch out for.
Quick Tips for Better Results
- Work in the shade: Direct sunlight dries the compound too fast and creates streaks.
- Use plenty of lubrication: Keep the surface wet with your water and soap solution during polishing.
- Replace pads frequently: Dirty pads drag debris across the glass and cause new scratches.
- Go slow: Rushing through the process leads to uneven results and missed spots.
- Use multiple cloths: Dedicate different cloths for applying compound, wiping residue, and final buffing.
Common Mistakes to Avoid
- Using the wrong compound: Paint correction compounds are too aggressive for glass. Always use a product formulated for glass.
- Skipping the cleaning step: Polishing over dirty glass grinds debris into the surface and creates new damage.
- Pressing too hard: Excessive pressure generates heat and can crack or stress the glass.
- Polishing damaged wipers: Worn wiper blades can scratch your freshly polished glass. Replace them first.
- Forgetting to seal: Polished glass without a sealant loses its clarity faster and is more vulnerable to new damage.
Maintaining Your Polished Auto Glass
Polishing is only half the battle. Proper maintenance keeps your glass looking great and protects your hard work. Here is how to maintain your freshly polished auto glass.
Daily and Weekly Care
Make it a habit to clean your windows regularly. Use a streak-free automotive glass cleaner and a clean microfiber cloth. Avoid household cleaners that contain ammonia, as they can strip away your glass sealant over time.
Quick wipe-downs after rain or dusty drives prevent mineral deposits and dirt buildup from settling in.
Monthly and Seasonal Maintenance
- Reapply glass sealant: Every 2 to 3 months, apply a fresh layer of glass sealant to maintain protection.
- Check your wipers: Replace worn wiper blades every 6 months. Old blades are one of the top causes of new scratches on glass.
- Park strategically: Whenever possible, park in the shade or a garage. This reduces UV damage on car windows and slows down oxidation.
- Avoid automatic car washes: The harsh brushes and chemicals can undo your polishing work. Stick to hand washing.
With consistent care, your DIY polish auto glass results can last for many months. The sealant acts as a shield, making future cleanings easier and faster.
When to Call a Professional
While DIY polish auto glass handles most surface-level issues beautifully, some problems are beyond the scope of home polishing. Knowing when to call a professional saves you time, money, and frustration.
Deep chips, cracks that run through the glass layers, and heavy pitting from long-term neglect may require professional attention. A trained technician can assess whether your glass needs repair or replacement.
If you have tried polishing and still see deep scratches that do not fade, it is time to consult an expert. Forcing the issue with aggressive compounds can weaken the glass and create safety hazards.
Conclusion
DIY polish auto glass is a simple, affordable, and incredibly rewarding project. You do not need fancy equipment or years of experience to get professional-quality results. With the right glass polishing compound, a quality orbital polisher, and the steps outlined in this guide, you can remove scratches, eliminate haze, and restore full clarity to every window on your vehicle.
Remember to take your time, follow each step carefully, and avoid the common mistakes that can undo your progress. Proper maintenance with a glass sealant keeps your results looking great for months to come.
Start with one window, practice your technique, and watch the transformation unfold. Once you see the difference, you will wonder why you ever paid someone else to do it. Grab your supplies, roll up your sleeves, and bring your auto glass back to life today.
Frequently Asked Questions
Can I polish auto glass by hand without a machine?
Yes, you absolutely can. Hand polishing takes more elbow grease and time, but it produces excellent results for light to moderate haze and swirl marks. Use a soft microfiber cloth and apply the compound in gentle circular motions. The key is to be patient and work in small sections for even coverage.
How long does polished auto glass last before it needs to be redone?
With proper maintenance and a quality glass sealant, polished auto glass can stay clear for 3 to 6 months. Factors like sun exposure, driving conditions, and how often you wash your car affect the longevity. Reapplying sealant every 2 to 3 months helps extend the results significantly.
Is it safe to polish tinted auto glass?
Yes, but you need to be extra careful. Use a gentle, fine-grit compound and avoid heavy-cut products that could damage the tint layer. Work slowly and avoid letting the polisher sit in one spot for too long. Always check your vehicle’s tint warranty before starting any polishing project.
What is the difference between polishing glass and paint correction?
Glass polishing uses much finer compounds and softer pads compared to paint correction. Glass is non-porous and does not have a clearcoat layer like your car’s paint. Using paint correction products on glass can cause irreversible damage, so always choose a compound specifically formulated for glass surfaces.
Can polishing fix a cracked windshield?
No, polishing cannot repair cracks. It is designed to address surface-level issues like haze, swirl marks, and light scratches. If your windshield has a crack or deep chip, you need professional repair or replacement. Attempting to polish a cracked windshield can weaken the glass further and create safety risks.
What should I do if I accidentally create new scratches while polishing?
Do not panic. Stop polishing immediately and clean the glass thoroughly. If the scratches are very light, a finer compound or a finishing polish may remove them. For deeper scratches caused during the process, it is best to consult a professional. Always use the least aggressive compound first and work your way up only if needed.